Saturday, October 21, 2023

Monitor MySQL Heatwave Instance from MySQL Enterprise Monitor


- Introduction:

  • MySQL Heatwave Cloud Database System endpoint has a private IP address. You cannot connect directly to it from a remote IP address. 
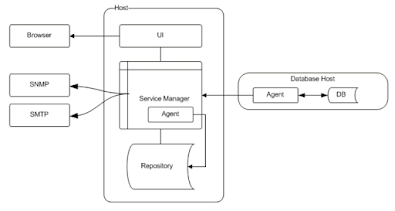
  • There is no SSH access to DB system endpoint. It is not possible to install MySQL Enterprise Monitor agent on the DB system, so the MySQL Heatwave database will be monitored using MySQL enterprise monitor's built-in agent.
In this blog, we will demonstrate the steps to add MySQL Heatwave database (the same steps will be used for non-Heatwave MySQL instances) to MySQL enterprise monitor from monitor console.

- Prerequisites:
  • An Oracle cloud free trial or paid account.
  • A VCN with public subnet, private subnet, security lists, and route tables.
  • MySQL Enterprise Monitor installed on OCI compute instance. You may follow steps in blog "Install MySQL Enterprise Monitor".
  • One OCI compute instance VM located in VCN’s public subnet with API RSA private key.
  • One MySQL Heatwave database system located in VCN's private subnet.
  • Private subnet security list has below Ingress and Egress rules to allow access from public subnet to private subnet where MySQL Heatwave database system is located.

    Rule Type

    Source

    IP Protocol

    Source Port Range

    Destination Port Range

    Ingress

    <Private Subnet CIDR>

    TCP

    All

    3306 (MySQL default port)

    Egress

    <Private Subnet CIDR>

    TCP

    All

    All


  • Public subnet security list has below Ingress and Egress rules to allow access from Internet to public subnet where VM is located (where MySQL Enterprise Monitor is installed). 

    Rule Type

    Source

    IP Protocol

    Source Port Range

    Destination Port Range

    Ingress

    0.0.0.0/0

    TCP

    All

    18443, 18080

    Egress

    0.0.0.0/0

    TCP

    All

    All


Steps to Add MySQL Database Instance


1. Login to MySQL enterprise monitor console with admin account.
    - Console "https://<MySQL-Monitor-VM-IP>:18443".


2. Navigate to "Configuration => MySQL Instances".


3. From MySQL Instances page, click "Add MySQL Instance".


4. On Add Instance dialog box select/enter below values then click "Add Instance".
     - Select "Monitor From": MEM Built-in Agent
     - Select "Connect Using": TCP/IP
     - Enter "Instance Address": MySQL Heatwave DB system's endpoint IP
     - Enter "Port": MySQL database instance default port 3306
     - Enter "Admin User": MySQL Heatwave DB's admin user
     - Enter "Admin Password": MySQL Heatwave DB's admin user's password
     - Select "Auto-Create Less Privileged Users": No  


  - Console will show "New instance (discovering)".
     Note: MySQL Heatwave instances will always show OS version "Remotely Monitored" because built-in agent is used to monitor DB system.


  - Console will show instance configuration once adding instance completes.


MySQL database instance is monitored now !!!.


Install MySQL Enterprise Monitor on Windows


- Overview:

  • MySQL Enterprise Monitor provides real-time visibility into the performance and availability of all your MySQL databases.
  • MySQL Enterprise Monitor has the following components:
    • MySQL Enterprise Service Manager: analyzes, presents and stores the data collected by the agents. The data is stored in MySQL repository database. The service manager also contains a built-in agent which is used to monitor MySQL repository database and MySQL enterprise service manager host.
    • MySQL Enterprise Monitor Agent: monitors the MySQL databases instances and hosts, and collects data. The collected data is sent to MySQL enterprise service manager for analysis and presentation. The agent is installed on the same host as the monitored MySQL instances.
  •  There are two types of installation architectures:
    • MySQL Enterprise Monitor Architecture: where agents are installed on monitored hosts.


    • MySQL Enterprise Monitor Agentless Architecture: where the agent is not installed on the monitored hosts, and MySQL instances are monitored by the MySQL enterprise manager's built-in agent.


In this blog, we will demonstrate the steps to install MySQL Enterprise Monitor using the bundled MySQL repository database on Windows.

Step #1: Download MySQL Enterprise Monitor software

You can download installation software from https://edelivery.oracle.com/osdc/faces/SoftwareDelivery.  

1. Provide login credentials when asked and in search box type "MySQL Enterprise Monitor". Select "REL: MySQL Enterprise Monitor 8.0.35" product and click continue.


2. Select "Microsoft Windows x64 (64-bit) platform and click continue.


3. Accept License Agreement and click continue.
4. Select "MySQL Enterprise Monitor Service Manager" only and click download.


Step #2: Install MySQL Enterprise Monitor using GUI

- Installation overview:
  • Setup will install a bundled Tomcat server
  • Setup will create a bundled MySQL database instance to be used as a repository database. You will be asked to provide repository database information (MySQL database Repository admin user, password, MySQL database name, MySQL database port).  
  • Once setup completes Windows will create two services to manage start/stop Tomcat server and MySQL enterprise service manager.
  • MySQL Enterprise Monitor Console will be "https://localhost:18443".


1. Unzip downloaded software.
2. Run installer "mysqlmonitor-8.0.35.1504-windows64-installer.exe" and follow installation wizard as show below.


3. Once setup completes, launch browser and connect to Monitor console "https://localhost:18443" to complete service manager installation and configuration.
- You need to enter user name and password for "manager" role user and "agent" role user.
- You can change data retention settings (default 4 weeks). I changed to 1 week in my setup.


Thanks for reading. Hope you like it !!!. 


Friday, October 20, 2023

Connect to OCI MySQL Heatwave from MySQL Workbench


 - Introduction: 

  • MySQL Heatwave is a fully managed cloud database service (PaaS) that combines transactions, analytics, and machine learning services into one MySQL Database, without the complexity, latency, and cost of ETL duplication.
  • The database system endpoint is where clients such as MySQL Shell, MySQL Client, MySQL Workbench, and your applications can connect to Oracle MySQL Heatwave database.
  • MySQL Heatwave Cloud Database System endpoint has a private IP address. You cannot connect directly to it from a remote IP address. There is no SSH access to DB system endpoint. Instead, you need to connect to the endpoint by one of these methods: 
    • Connect from an Oracle OCI compute instance that is on the same OCI VCN as the database system. With this method, you install the client software on the compute instance like MySQL Shell.
    • Use a secured access service, such as a VPN connection or Oracle Cloud Infrastructure’s Bastion service, to bridge from your local network to the OCI VCN with access to the database system. With this method, you install the client software on your local machine, and connect directly to the database system endpoint.
  • What is MySQL Workbench?. MySQL Workbench is a unified visual tool for database architects, developers, and DBAs. MySQL Workbench provides data modeling, SQL development, and comprehensive administration tools for server configuration, user administration, backup, and much more.
In this blog, we will demonstrate the steps to connect to OCI MySQL Heatwave database from your local machine using MySQL Workbench.


- Prerequisites:
  • MySQL Workbench 8 installed on your local machine.
  • An Oracle cloud free trial or paid account.
  • A VCN with public subnet, private subnet, security lists, and route tables.
  • One OCI compute instance VM located in VCN’s public subnet with API RSA private key.
  • One MySQL Heatwave database system located in VCN's private subnet.
  • Private subnet security list has below Ingress and Egress rules to allow access from public subnet to private subnet where MySQL Heatwave database system is located.

Rule Type

Source

IP Protocol

Source Port Range

Destination Port Range

Ingress

<Private Subnet CIDR>

TCP

All

3306 (MySQL default port)

Egress

<Private Subnet CIDR>

TCP

All

All

  • Public subnet security list has below Ingress and Egress rules to allow access from Internet to public subnet where VM (bastion) is located. 

Rule Type

Source

IP Protocol

Source Port Range

Destination Port Range

Ingress

0.0.0.0/0

TCP

All

22

Egress

0.0.0.0/0

TCP

All

All


 Step #1: Start MySQL Workbench on your local machine


Step #2: Create MySQL Connection to MySQL Heatwave

1. In Welcome page, click + sign to create new MySQL connection.
2. In "Setup New Connection" dialog box select "Connection Method" = "Standard TCP/IP over SSH".


3. Use connection parameters as highlighted in screenshot below then click "Test connection" button.


4. Enter DB user password then click "OK" button.


5. Click "OK" button to save the connection. 
6. Click new connection name to connect to MySQL database.


7. Here we go !. We are connected now to OCI MySQL Heatwave database.


Thanks for reading. Hope you like it !!!. 

Oracle 23ai: Quick Overview

  Oracle Database 23ai Oracle database 23ai is the next long-term support release of Oracle database. It brings AI to your data with the ad...