Thursday, March 14, 2024

ExaCC: Disable Oracle Archivelog Automatic Deletion Job


- Problem:

  • Some of my (ExaCC) customers reported that Oracle archive logs are automatically deleted for some databases running on ExaCC cluster, even they haven't deleted or not configured a job to backup and delete archive logs.  

- Overview:

  • Whenever we create a database on ExaCC cluster from OCI console, Oracle will add a crontab job  in VM cluster nodes to auto delete archive logs every 30 minutes.
  • Oracle uses "bkup_api" tool to auto delete archive logs.

- Checking:

   - As root user run below command to get the contents of "bkup_api" config file for your database.
     /var/opt/oracle/bkup_api/bkup_api get config --file=/<output_file> --dbname=<DB_NAME>


   - Search output config file for parameter "bkup_archlog_cron_entry". If the value is "yes", then this confirms that there is a scheduled job to automatic cleanup of archive logs.

  $ cat /tmp/exadb_bkp.conf | grep bkup_archlog_cron_entry
bkup_archlog_cron_entry=yes

    - As root user search "/etc/crontab" file for a cleanup entry specific to your database.

$ cat /etc/crontab_dba_bkp | grep exadb
19,49 * * * * oracle /var/opt/oracle/bkup_api/bkup_api bkup_archlogs --cron --dbname=exadb

     As you can see above, there is a crontab job that cleanup archive logs for database exadb every 30 minutes. 

- Solution:

- The recommended solution is configuring archive log deletion policy in RMAN repository.
For example,
CONFIGURE ARCHIVELOG DELETION POLICY TO BACKED UP 1 TIMES TO DEVICE TYPE DISK;
CONFIGURE ARCHIVELOG DELETION POLICY TO BACKED UP 1 TIMES TO DEVICE TYPE 'SBT_TAPE';

- A workaround solution, which is not recommended:
 
1. As a root user, take a backup of "/etc/crontab" file on ExaCC VM 1st node.
2. As a root user, edit file "/etc/crontab" and remove entry related to archive maintenance for each database.

In our example, remove below line.
19,49 * * * * oracle /var/opt/oracle/bkup_api/bkup_api bkup_archlogs --cron --dbname=exadb

NOTE:  You need to remove line completely from crontab, commenting out may not work in ExaCC.

3. Check "/etc/crontab" file on other DB nodes also and make sure there are no entries for archive maintenance.


MySQL: Move MySQL OCI DB System to Different Compartment


- Overview:

  • There is no option on OCI console to move MySQL DB system to different compartment.
  • The only option, which is available at the time of writing this blog, is to create a new DB system in different compartment by restoring the backup of the original MySQL DB system. 
  • There are three types of MySQL DB system backups to restore from.
    •  Automatic Backup.
    • Manual Backup.
    • Operator Backup.
  • When you create a new DB system from a backup, it retains the administrator credentials of the original DB system.
  • When you restore an automatic, manual, or operator backup, you restore the complete data of the original DB system in the same tenancy.
  • You cannot create a DB system that has the same IP address as a running DB system. If you want to use the same IP address, delete the original running DB system. 

In this blog, I'll demonstrate the steps to create new MySQL DB system by restoring from the backup of another running DB system using OCI console. 

 - Prerequisites:

  • An Oracle cloud fee trial or paid account.
  • An existing MySQL DB system.  
  • An existing manual or Automatic backup for the MySQL DB system.

Steps Restoring From a Backup

1. Sign in to the OCI console.
2. Open the navigation menu and navigate to "Databases -> DB Systems".


3. Choose your compartment. The list of MySQL DB system is displayed. Click your DB system name.


4. Choose the "Restore to new DB system" from the Actions menu.


5. On the "Restore to a new DB System" panel, there are two options to restore from: 
- Restore from DB system at a point-in-time


- Restore from a backup
 In our example, select "Restore from a backup" and click "Select backup".


6. On the "Browse all Backups" panel, select the backup from the list of available backups, and click "Select backup". I'll use the manual backup, which was taken previously.


7. On "Provide DB system information" panel, provide the information of new DB system.
- Compartment: make sure to select the right target compartment.
- DB system name.


- DB system type: Select Standalone for a single-instance DB system, and select High availability for a three-instance DB system.
- Configure networking: select VCN and private subnet.


- Select a shape: you can select a different shape other than the shape of the original running DB system.
- Define Data storage size: should be equal or greater than the storage size of the original running DB system.


- Configure backup plan.


8. Finally, click "Restore".

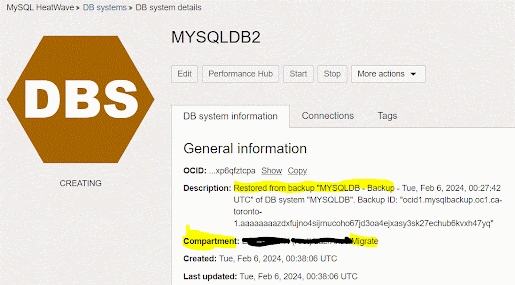
9. On DB system details home page and under General information section, it will show in the description "Restored from backup".


Now, you have a new standalone DB system, which has the complete data of the original DB system in different compartment.


Oracle 23ai: Quick Overview

  Oracle Database 23ai Oracle database 23ai is the next long-term support release of Oracle database. It brings AI to your data with the ad...