Sunday, November 19, 2023

ExaCC: Create a Custom Database Software Image


- Overview:

  • ExaCC users patch and provision their Oracle Database Homes using standard Oracle published images. 
  • Oracle makes the major Oracle database versions with the last 4 release updates available on control plane servers for download.
  • Custom database software images provide
    • Apply a standardized custom Database Software Image across multiple Database Homes for specific application needs.
    • Move on-premise databases running custom one-off software updates to ExaCC.
    • Build custom images within ExaCC service without special entitlements required to download patches from MOS.

In this blog, I'll demonstrate the steps to create a custom database software image using OCI console then use the new image to create a database home.

Step #1: Create A  Custom Database Software Image

1.  Sign in to your OCI tenancy where your Exadata Database Service on Cloud @ Customer system is deployed.

2. Navigate to "Oracle Database" > "Oracle Exadata Database Service on Cloud@Customer".


3. Under "Resources" section, select "Database Software Images" then click "Create Database Software Image" button.


4. In "Create Database Software Image" screen, provide the required information then click "Create Database Software Image" button.
     - Display Name: Image display name.
     - Choose the right compartment.
     - Choose major database version.
     - Choose a patch set update, proactive bundle patch, or release update.
     - Enter one-off patch numbers (optional).


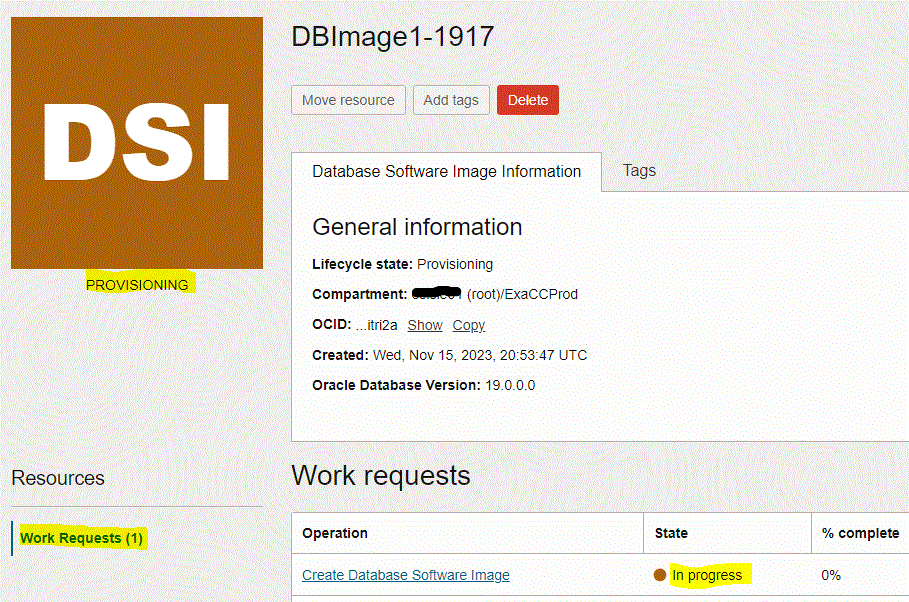
Once create database software image successfully completes, image state will be "Available". 


Step #2: Create A Database Home Using New Image

1. Navigate to "Oracle Database" > "Oracle Exadata Database Service on Cloud@Customer".
2. Click on your VM cluster name.
3. Under "Resources" section, select "Database Homes" then click "Create Database Home" button.


4. In "Create Database Home" screen, enter database home, click "Change Database Image" button to select database home image type from either "Oracle Provided Database Software Images" or "Custom Database Software Images".


5. In "Select a Database Software Image" screen
    - Image Type: select "Custom Database Software Images".
    - Choose a compartment: the compartment where you created the customized image.
    - Select image row from the list of available customized images.


6. Click "Create Database Home" button.


Once create database home successfully completes, Oracle database home state will be "Available". 


7. Connect to any of the VM cluster nodes and run "opatch lspatches" to confirm installed patches.


ExaCC: Scale VM Cluster Exadata Usable Storage


- Overview:

  • With multiple VMs per Exadata Infrastructure feature release, you can scale up or down the following resources on VM cluster:
    • Local storage /u02. Scaling memory requires a rolling restart of the cluster nodes to take effect.
    • Memory. Scaling memory requires a rolling restart of the cluster nodes to take effect.
    • OCPU. Scaling OPCU is Online.
    • Exadata storage. Scaling OPCU is Online.
  • The minimum recommended size is 2 TB.
  • Use the following formula to calculate the minimum required ASM storage:
    • For each disk group, for example, DATA, RECO, note the total size and free size by running the "asmcmd lsdg" command on any node of the VM cluster.
    • Calculate the used size as (Total size - Free size) / 3 for each disk group. The /3 is used because the disk groups are triple mirrored.
    • DATA:RECO ratio is:
      • 80:20 if Local Backups option was NOT selected in the user interface.
      • 40:60 if Local Backups option was selected in the user interface.
    • Ensure that the new total size as given in the user interface passes the following conditions:
      • Used size for DATA * 1.15 <= (New Total size * DATA % ).
      • Used size for RECO * 1.15 <= (New Total size * RECO % ).

In this blog, I'll demonstrate the steps to scale up the usable Exadata storage using OCI console.

Steps to Scale Up VM Cluster Exadata Usable Storage 


1. Note the current total size and free size by running "asmcmd lsdg" command on any node of the VM cluster.


2.  Sign in to your OCI tenancy where your Exadata Database Service on Cloud @ Customer system is deployed.

3. Navigate to "Oracle Database" > "Oracle Exadata Database Service on Cloud@Customer" > "Exadata VM Clusters".


4. Click on your VM cluster name.


5. On VM cluster details home page, click "Scale VM Resources" button.


6. On "Scale VM Cluster" screen, under "Configure the Exadata storage" section, specify the usable Exadata storage new size then click "Save Changes" button. The new size will be distributed based on DATA:RECO ratio, which is 80:20 in our example.  


Cluster state will switch to "UPDATING", but all resources will be UP on both nodes.


You can track scaling progress and activities from "Work Requests" page under Resources section in VM cluster details home page.


Once scaling successfully completes, cluster's state will changed back to "AVAILABLE". Under "Resource allocation" section, Exadata Storage (TB) will show the new total usable storage.


7. Connect to any of the VM cluster and run "asmcmd lsdg" command to check ASM disk groups new size.


ExaCC: Scale VM Cluster Local Storage Size


- Overview:

  • With multiple VMs per Exadata Infrastructure feature release, you can scale up or down the following resources on VM cluster:
    • Local storage /u02. Scaling memory requires a rolling restart of the cluster nodes to take effect.
    • Memory. Scaling memory requires a rolling restart of the cluster nodes to take effect.
    • OCPU. Scaling OPCU is Online.
    • Exadata storage. Scaling OPCU is Online.  
  • You specify how much space is provisioned from local storage to each VM. 
  • This space is mounted at location /u02, and is used primarily for Oracle Database homes
  • The minimum supported size of /u02 is 60 GB per VM.
  • The maximum supported size of /u02 is 900 GB per VM. Depending on the number of other VMs in the system and the space consumed by those VMs.
  • A rolling restart of each VM is required to resize /u02.

In this blog, I'll demonstrate the steps to scale up local file system size using OCI console.

Steps to Scale Up VM Cluster Local File System Size

1.  Sign in to your OCI tenancy where your Exadata Database Service on Cloud @ Customer system is deployed.

2. Navigate to "Oracle Database" > "Oracle Exadata Database Service on Cloud@Customer" > "Exadata VM Clusters".


3. Click on your VM cluster name.


4. On VM cluster details home page, click "Scale VM Resources" button.


5. On "Scale VM Cluster" screen, under "Resource allocation per VM" section, enter local file system size per VM then click "Save Changes" button.


You can track scaling progress and activities from "Work Requests" page under Resources section in VM cluster details home page.


Once scaling successfully completes, cluster's state will changed back to "AVAILABLE". Under "Resource allocation" section, Local Storage (GB) will show the new total size for the cluster.


Also you can confirm new size from VM node by running df -h command.


Saturday, November 18, 2023

ExaCC: Patch VM Cluster Grid Infrastructure


- Overview:

  • Oracle is responsible to perform patches and updates to EXACC infrastructure every quarter (there is no patch in Dec). That includes:
    • Physical compute nodes (Dom0).
    • Network switches.
    • Power distribution units (PDUs).
    • Integrated lights-out management (ILOM).
    • Exadata storage servers.
  • The customer is responsible for patching Oracle GI Clusterware.
  • Patching Oracle GI will be applied in the rolling manner to preserve database availability throughout the patching process.
  • Patching prerequisites
    • /u01 on the database host file system has at least 15 GB of free space.
    • The Oracle Clusterware is up and running on both VM cluster’s nodes.
    • The VM cluster’s nodes are up and running.
  • Patching tools
    • Oracle OCI console.
    • DBAASCLI command line utility from one of VM cluster nodes.

In this blog, I'll demonstrate the steps to patch Grid Infrastructure on ExaCC VM cluster to the latest available release update (19.21 Oct/2023 at the time of writing this blog) using OCI console.

To apply a patch to Oracle Grid Infrastructure using DBAASCLI command line utility from one of VM cluster nodes. A high level steps:

1. Connect to VM as opc user.
2. Download GI patch from OCI control Plane server.
sudo dbaascli cswlib download --product GRID --version 19.21.0.0.0
sudo dbaascli cswlib showImages --product grid

3. Run Precheck.
sudo dbaascli grid patch --targetVersion 19.21.0.0.0 --executePrereqs

4. Apply patch.
sudo dbaascli grid patch --targetVersion 19.21.0.0.0 


Steps to Patch Grid Infrastructure on VM Cluster


1.  Sign in to your OCI tenancy where your Exadata Database Service on Cloud @ Customer system is deployed.

2. Navigate to "Oracle Database" > "Oracle Exadata Database Service on Cloud@Customer" > "Exadata VM Clusters".


3. Click on your VM cluster name.


4. On VM cluster details home page, next to "Updates Available" click "View updates" link.


5. Run patching Precheck
If the precheck is not successful, then the patch is not applied, and the system displays a message that the patch cannot be applied because the precheck failed.

    - On Patches releases page, you will a list of available release update patches for "Virtual Machine OS Update" and "Grid Infrastructure Release Update".
    - Review the list of available GI updates. Click the Actions icon (three dots) at the end of the row listing the patch you are interested in, and then click "Precheck" action, then run "Run Precheck" button in confirm precheck screen.


Note: once Precheck finishes, update state will be "Available". On "Update History" page, update state will be "Precheck Passed".


6. Apply GI Update.

Note: Patching of GI on cluster nodes will be executed in the rolling mode to preserve database availability throughout the update process.

Click the Actions icon (three dots) at the end of the row listing the patch that passed Precheck, and then click "Apply Grid Infrastructure Patch" action, then run "Apply Patch" button in confirm screen.


You can track patching progress from "Work Requests" page under Resources section in VM cluster details home page.


Note: once patching finishes, on "Update History" page, update state will be "Applied".


On VM cluster details page, Grid Infrastructure Version will be updated.


Congratulations, patching GI on ExaCC cluster nodes is completed !!!. 

Friday, November 17, 2023

ExaCC: Patch VM Cluster OS Image


- Overview:

  • Oracle is responsible to perform patches and updates to EXACC infrastructure every quarter (there is no patch in Dec). That includes:
    • Physical compute nodes (Dom0).
    • Network switches.
    • Power distribution units (PDUs).
    • Integrated lights-out management (ILOM).
    • Exadata storage servers.
  • The customer is responsible for managing patches and updates of OS for VM cluster’s nodes.
  • The customer can apply Oracle Exadata software release updates to VM cluster’s nodes at his/her convenience.
  • Patching of VM cluster’s nodes will be executed in the rolling mode to preserve database availability throughout the update process.
  • VM cluster patching tools:
    • Oracle OCI console.
    • patchmgr utility. The customer can run the utility either from one of ExaCC VM cluster nodes or from another server running Oracle Linux.


In this blog, I'll demonstrate the steps to patch/update ExaCC VM cluster OS image to the latest available release update using OCI console.

Steps to Update ExaCC VM cluster OS Image

1.  Sign in to your OCI tenancy where your Exadata Database Service on Cloud @ Customer system is deployed.

2. Navigate to "Oracle Database" > "Oracle Exadata Database Service on Cloud@Customer" > "Exadata VM Clusters".


3. Click on your VM cluster name.


4. On VM cluster details home page, next to "Updates Available" click "View updates" link.


5. Run patching Precheck
If the precheck is not successful, then the patch is not applied, and the system displays a message that the patch cannot be applied because the precheck failed.

    - On Patches releases page, you will a list of available release update patches for "Virtual Machine OS Update" and "Grid Infrastructure Release Update".
    - Review the list of available software updates. Click the Actions icon (three dots) at the end of the row listing the patch you are interested in, and then click "Precheck" action, then run "Run Precheck" button in confirm precheck screen.


Note: once Precheck finishes, update state will be "Available". On "Update History" page, update state will be "Precheck Passed".


6. Apply Exadata OS Image Update.

Note: Patching of VM cluster’s nodes will be executed in the rolling mode to preserve database availability throughout the update process.

Click the Actions icon (three dots) at the end of the row listing the patch that passed Precheck, and then click "Apply Exadata OS Image Update" action, then run "Apply Exadata Image Update" button in confirm screen.


Note: once patching finishes, on "Update History" page, update state will be "Applied".


On VM cluster details page, Exadata Image Version will be updated.


7. Confirm Exadata image version by running "imageinfo" command on VM cluster nodes.


Congratulations, patching VM cluster OS is completed !!!.  

Oracle 23ai: Quick Overview

  Oracle Database 23ai Oracle database 23ai is the next long-term support release of Oracle database. It brings AI to your data with the ad...