We have started workshop in the previous blog "Oracle OCI Site-to-Site VPN to Meraki Switch - Part 2" where we covered the steps to create DRG, private subnet, and security list.
In this blog, we will complete the workshop by creating Site-to-Site VPN configuration then configuring Meraki Cisco switch.
In this blog, we will complete the workshop by creating Site-to-Site VPN configuration then configuring Meraki Cisco switch.
Step #6: Create Site-to-Site VPN
We will use the
wizard to setup Site-to-Site VPN. The wizard sets up a Site-to-Site VPN between
your on-premises network and your Oracle VCN. That includes the IPSec
encrypted tunnels and customer-premises equipment (CPE).
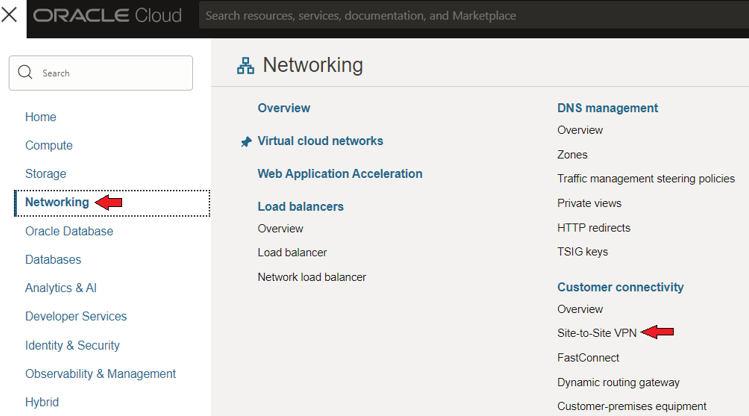
1. Open
the navigation menu, click “Networking”, and then click “Site-to-Site
VPN”.
2. Click “Start VPN
wizard”.

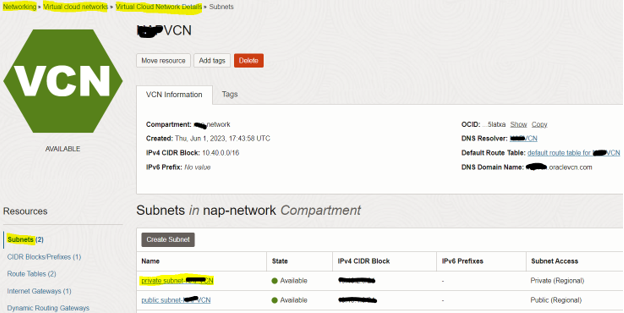
3. In “Create
Site-to-Site VPN” dialog window, in “Basic information” window select VCN’s
compartment and VCN name, then click next. DRG and IGW will be automatically
populated.


In “Subnets and
security” window, select “Select existing security list” option, click “choose
subnets” to select private subnet.

In “Choose subnets”
dialog window, select private subnet, click “Choose subnets”.

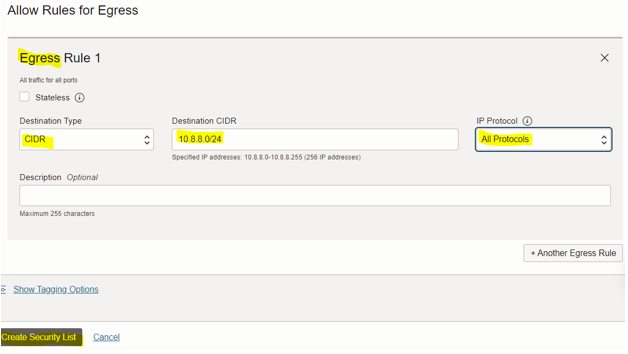
Make sure to select the correct Security list created in step #4 from previous blog.

In “Site-to-Site VPN”
window, enter and select below options then click “Next”.
- VPN Name
- Routing Type: Policy based routing.
- Routes to your on-premises network: In our example, 10.8.8.0/24

In "Tunnel 1 & 2
information" section select below options
- IKE Version: IKEv1
- On-premises network CIDR blocks: In our example, 10.8.8.0/24
- On-premises cloud CIDR blocks (this is on OCI): In our example, 172.40.40.0/24

In “CPE” window,
enter and select below information, click “Next”.
- CPE name
- IP Address: The public IP address of your CPE device. In this example, 142.35.140.32
- Vendor: Other

In “Review and
create” window, click “Create VPN solution” at the bottom. Once provisioning
completes VPN state will be available.

4. Click VPN name to collect
tunnels information. Below information are required to configure on-premises
Meraki switch.
- Tunnel 1 public IP
address – Oracle VPN IP address

- Tunnel 1 shared
secret

- Phase details: click
on Tunnel 1 name then navigate to “Phase details” tab. Required
information.
- lifetime in seconds
- Diffie-Hellman group
- Diffie-Hellman group

Step #7: Configure Cisco Meraki Switch
Note: You will notice
that there are two IPSec Tunnels from Oracle’s side. Meraki only supports
connecting to one at a time.
- Open the Meraki Dashboard.
- Navigate to the Site-to-Site VPN settings page (Security & SD-WAN, Site-to-site VPN.
- Select Hub (Mesh) as the type.
- Enable the VPN “only for subnets listed in your IPSec connection” — having one too few or one too many will cause the entire connection to fail.
- Add a Non-Meraki VPN Peer
- Give it a name.
- Set the Public IP to the Public IP of Oracle VPN tunnel 1.
- Leave Remote ID blank.
- Set Private subnets to the Oracle VCN’s private subnet CIDR Block. In our example, 172.40.40.0/24.
- Set IPSec policies to custom and follow the configuration below. Use OCI tunnel’s phases information collected in step #6.
- Fill in your OCI Tunnel “shared secret” collected in step #6.
- Set Availability to all networks.

Step #8: Test connection
Once Meraki switch
configuration completes Oracle tunnel status will be up.
We’re all done
provisioning, and you should now be able to ping and ssh from on-premises to
Oracle compute instance located in private subnet.
You can access VPN
logs as shown below.

Workshop is completed. IPSec VPN connection between your on-premises and Oracle VCN
private subnet is ready now!.


.png)


