In this workshop, we will see the steps to setup Site-to-Site VPN to Meraki Cisco switch with a simple layout that you might use for a proof of concept (PoC). The workshop will be covered over two blog posts.

- Prerequisites:
- An Oracle cloud free trial or paid account.
- OCI VCN with a private subnet and a route table.
- OCI Linux compute instance located in a VCN’s private subnet.
- Assumptions:
- OCI VCN’s CIDR: 172.40.0.0/16
- OCI private subnet CIDR: 172.40.40.0/24
- OCI VM private IP: 172.40.40.60
- The public IP address of your CPE device: 142.35.140.32
- On-premises private subnet CIDR: 10.8.8.0/24
- Routing Type: Policy-based
- Cisco Device: Meraki
Step #1: Create Dynamic Routing Gateway (DRG)


Step #2: Attach the DRG to the VCN
1. Click the name of the DRG you created.
2. Under “Resources” section, click “Virtual
Cloud Networks Attachment”.
3. Click “Create Virtual Cloud Network
Attachment”.

4. In “Create Virtual Cloud Network Attachment”
dialog window, enter “attachment name” and select the VCN. Ignore the section
for advanced options, which is only for an advanced routing scenario called
transit routing, which is not relevant here. Click “Create Virtual Cloud
Network Attachment”.

Step #3: Update Existing Private Subnet’s Route Table
We need to add a below route rule.
|
Destination CIDR |
Target Type |
Target |
Route Type |
|
On-premises
private subnet CIDR: 10.8.8.0/24 |
Dynamic
Routing Gateways |
DRG Name |
Static |
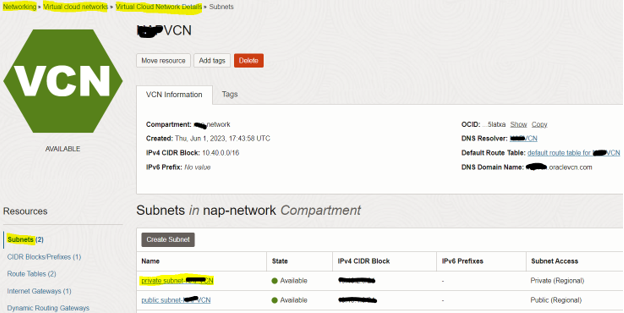
1. Open the navigation menu, click “Networking”,
and then click “Virtual cloud networks”.
2. Click your VCN.
3. Under “Resources” section, click “Route
Tables”. Click private subnet’s route table name.

4. In Route Table screen, click “Add Route Rules”.

5. In “Add Route Rules” dialog window, enter below information then click “Add Route Rules”.
- Destination Type: CIDR Block

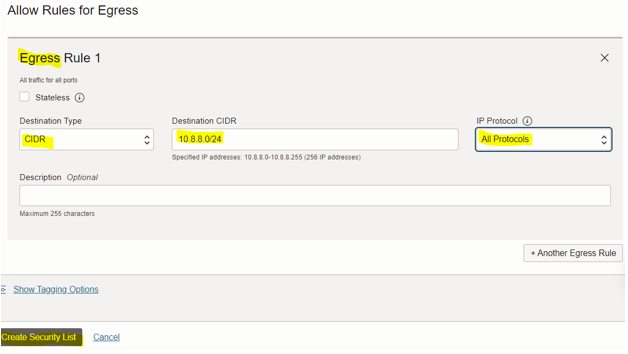
Step #4: Create a Security List
By default, incoming traffic to the instances in your VCN is
set to DENY on all ports and all protocols. In this task, you set up two
ingress rules and one egress rule to allow basic required network traffic.
We need to add below Ingress and Egress rules.
|
Ingress/Egress |
CIDR |
Protocol: Port |
|
Ingress |
On-premises
private subnet CIDR: 10.8.8.0/24 |
All: All |
|
Egress |
On-premises
private subnet CIDR: 10.8.8.0/24 |
All: All |
1. Open the navigation menu, click “Networking”,
and then click “Virtual cloud networks”.
2. Click your VCN.
3. Under “Resources” section, click “Security
Lists”. Click “Create Security List”.
4. In “Create Security List” dialog window,
enter security list name, select the same compartment as VCN, enter Ingress
& Egress rules listed in above table. Click “Create Security List”.

Step 5: Add Security List to Existing Private Subnet
1. Open the navigation menu, click “Networking”,
and then click “Virtual cloud networks”.
2. Click your VCN.
3. Under “Resources” section, click “Subnets”.
Click private subnet name.
4. In private subnet scree, click “Add Security List”.

5. In “Add Security List” dialog window, select security list’s compartment and select security list created in step #4. Click “Add Security List”.

Next blog, we will cover the steps to create Site-to-Site VPN and configure Meraki Cisco switch.
Next blog => Oracle OCI Site-to-Site VPN to Meraki Switch - Part 2
.png)


No comments:
Post a Comment