Friday, February 2, 2024

Oracle 23ai: Configuring SQL Firewall Using the DBMS_SQL_FIREWALL Package


- Overview:

  • Oracle 23ai has SQL Firewall built into the database to effectively address both SQL injection attacks and compromised account issues. 
  • By building Oracle SQL Firewall inside the database and streamlining its implementation, the performance overhead of Oracle SQL Firewall is negligible, making it suitable for all production workloads. Because Oracle SQL Firewall is inside the database, you don’t need to deploy or manage any external components.
  • There are two methods of configuring SQL Firewall, either with Oracle Data Safe or with the DBMS_SQL_FIREWALL package. Both methods have their advantages, depending on how you want to use SQL Firewall. 


In this blog, I'll demonstrate the SQL Firewall functionality using the DBMS_SQL_FIREWALL Package.

Prerequisites:
  • Oracle Database 23ai Free Developer Release.
  • HR database schema.

SQL Firewall Process Flow:


SQL Firewall Configuration Steps

 
1. Connect to pluggable database as a user who has been granted the SQL_FIREWALL_ADMIN role. SYS user will be used for this example.

2. Enable SQL Firewall.

EXEC DBMS_SQL_FIREWALL.ENABLE;


3. Create and enable the SQL firewall capture for HR database user.

 BEGIN
          DBMS_SQL_FIREWALL.CREATE_CAPTURE (
               username         => 'HR',
               top_level_only   => TRUE,
               start_capture    => TRUE
          );
       END;
        /


top_level_only controls the level of SQL statements that are required. The default is FALSE. 
- TRUE generates capture logs only for top-level SQL statements that the user directly runs.
- FALSE generates capture logs for both top-level SQL statements and commands issued from PL/SQL units. 
start_capture controls whethe capture will be effective. The default is TRUE.
- TRUE enables SQL Firewall to start capturing the target user's activities right away.
- FALSE creates a capture for the user, but does not start the capture right away. You can start the capture later on by running DBMS_SQL_FIREWALL.START_CAPTURE('<USERNAME>') 

4. At this stage, assuming that you have set  START_CAPTURE to TRUE. Connect to the database as a user HR to run the SQL statements that are expected to be executed directly later.

For example,
select FIRST_NAME,LAST_NAME,JOB_ID from employees where DEPARTMENT_ID=110;
select FIRST_NAME,LAST_NAME,MANAGER_ID from employees where JOB_ID='AD_VP';
select * from departments where DEPARTMENT_NAME='Payroll';

5. As s SYS user, review the capture logs and sessions logs to determine the adequacy of the capture.

SELECT SQL_TEXT FROM DBA_SQL_FIREWALL_CAPTURE_LOGS WHERE USERNAME = 'HR';


6. As a SYS user, stop the capture. 

EXEC DBMS_SQL_FIREWALL.STOP_CAPTURE ('HR')


7. As a SYS user, generate the allow-list for the user. The allow-list defines the SQL statements that the user will be allowed to perform. SQL Firewall creates the allow-list based on data collected from existing capture logs for the user.

EXEC DBMS_SQL_FIREWALL.GENERATE_ALLOW_LIST ('HR')


8. As a SYS user, query DBA_SQL_FIREWALL_ALLOWED_SQL to find information about activities that the HR user is allowed to perform.

SELECT SQL_TEXT FROM DBA_SQL_FIREWALL_ALLOWED_SQL WHERE USERNAME = 'HR';


9. As SYS user, enable SQL Firewall protection by enabling the allow-list that was generated for the user. This enablement becomes effective immediately, even in the existing sessions of HR user.

BEGIN
  DBMS_SQL_FIREWALL.ENABLE_ALLOW_LIST (
    username       => 'HR',
    enforce        => DBMS_SQL_FIREWALL.ENFORCE_SQL,
    block          => TRUE
   );
END;
/


enforce specifies one of the following enforcement types:
-  DBMS_SQL_FIREWALL.ENFORCE_CONTEXT enforces the allowed contexts that have been configured.
DBMS_SQL_FIREWALL.ENFORCE_SQL enforces the allowed SQL that has been configured.
DBMS_SQL_FIREWALL.ENFORCE_ALL enforces both allowed contexts and allowed SQL. This setting is the default.
 
block 
- TRUE blocks the user's database connection or the user's SQL execution whenever the user violates the allow-list definition.
- FALSE allows unmatched user database connections or SQL commands to proceed. This setting is the default.

10. At this stage, if HR user attempts to perform a SQL query that violates the allow-list and you have specified SQL Firewall to block this SQL, then an ORA-47605 error appears. 
Connect as HR user and run SQL statements that are different than queries which have been captured.

select * from employees;
select FIRST_NAME,LAST_NAME,JOB_ID,salary from employees where DEPARTMENT_ID=110;
SELECT * FROM EMPLOYEES WHERE SALARY > 2000;
select * from departments where DEPARTMENT_NAME='Payroll';


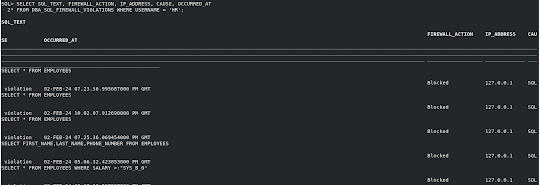
11. As as SYS user, Monitor the violation log for abnormal SQL connection attempts or SQL queries that are reported if they are not in allow-list.

SELECT SQL_TEXT, FIREWALL_ACTION, IP_ADDRESS, CAUSE, OCCURRED_AT FROM DBA_SQL_FIREWALL_VIOLATIONS WHERE USERNAME = 'HR';


- Reference


Thursday, February 1, 2024

Oracle 23ai: INTERVAL data type aggregations


- Overview:

  • Oracle 23ai introduces the use of SUM and AVG functions with INTERVAL datatype. 
  • This enhancement makes it easier to calculate totals and averages over INTERVAL values. 

In this blog, I'll demonstrate the use of SUM and AVG functions with INTERVAL datatype.

Prerequisites:
  • Oracle Database 23ai Free Developer Release.

Step #1: Preparation


The example in this blog requires the following table.

drop table if exists trips purge;

create table trips (
  id          number,
  start_time  timestamp,
  end_time    timestamp,
  duration    interval day to second generated always as (end_time - start_time) virtual
);

begin
insert into trips (id, start_time, end_time) 
values (1, timestamp '2024-01-20 08:45:00.0', timestamp '2024-01-20 18:01:00.0');
insert into trips (id, start_time, end_time) 
values (2, timestamp '2024-01-22 09:00:00.0', timestamp '2024-01-22 17:00:00.0');
insert into trips (id, start_time, end_time) 
values (3, timestamp '2024-01-25 08:00:00.0', timestamp '2024-01-25 17:45:00.0');
insert into trips (id, start_time, end_time) 
values (4, timestamp '2024-01-27 07:00:00.0', timestamp '2024-01-27 16:00:00.0');
insert into trips (id, start_time, end_time) 
values (5, timestamp '2024-01-28 07:00:00.0', timestamp '2024-01-28 16:00:00.0');
insert into trips (id, start_time, end_time) 
values (6, timestamp '2024-01-29 07:00:00.0', timestamp '2024-01-29 16:00:00.0');
insert into trips (id, start_time, end_time) 
values (7, timestamp '2024-01-30 07:00:00.0', timestamp '2024-01-30 16:00:00.0');
insert into trips (id, start_time, end_time) 
values (8, timestamp '2024-01-31 07:00:00.0', timestamp '2024-01-31 16:00:00.0');
commit;
end;
/


Step #2: Testing 

1. If we use SUM or AVG functions on an INTERVAL datatype on pre-23ai Oracle database, we will get an error as shown below.


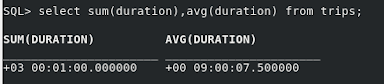
2. Oracle 23ai database allows the use of SUM and AVG functions with INTERVAL datatype.

select sum(duration),avg(duration) from trips;


- We can also use SUM and AVG as analytics functions with INTERVAL datatype. 

select id,start_time,end_time,duration,
sum(duration) over (order by id rows unbounded preceding) as DUR_RUN_TOTAL,
avg(duration) over (order by id rows unbounded preceding) as DUR_RUN_AVG
from trips;


Oracle 23ai: Direct Joins for UPDATE and DELETE Statements


- Overview:

  • Oracle 23ai now allows you to use direct joins to other tables in UPDATE and DELETE statements in the FROM clause.
  • These other tables can limit the rows changed or be the source of new values.
  • Direct joins make it easier to write SQL to change and delete data.

In this blog, I'll test executing UPDATE and DELETE commands with direct joins using the HR schema.

Prerequisites:
  • Oracle Database 23ai Free Developer Release.
  • HR database schema.

Update with Direct Join

Use-Case: Increase the salaries of the Finance department by 5%. 

1. Query the tables EMPLOYEES and DEPARTMENTS and look at the rows to be updated.

SELECT e.employee_id, e.department_id, e.first_name, e.Last_name, e.salary
FROM employees e, departments d
WHERE e.department_id=d.department_id 
AND d.department_name='Finance';


2. Writing UPDATE in pre-23ai Oracle database using sub-query in the WHERE clause.

UPDATE employees e
SET e.salary=e.salary*1.05
WHERE e.department_id in (
SELECT department_id
FROM departments
WHERE department_name='Finance');


3. Writing UPDATE in Oracle 23ai database using direct join then query the tables.

When we run the SQL plan, we notice that the join is using the index EMP_DEPARTMENT_IX to access EMPLOYEES table. It is the same SQL plan and cost when using update with sub-query in the WHERE clause.

explain plan for 
UPDATE employees e
SET e.salary=e.salary*1.05
FROM departments d
WHERE e.department_id=d.department_id 
AND d.department_name='Finance';


UPDATE employees e
SET e.salary=e.salary*1.05
FROM departments d
WHERE e.department_id=d.department_id 
AND d.department_name='Finance';


Delete with Direct Join 

Use-Case: delete the employees of the Finance department.

 1. Query the tables EMPLOYEES and DEPARTMENTS and look at the rows to be updated.

SELECT e.employee_id, e.department_id, e.first_name, e.Last_name, e.salary
FROM employees e, departments d
WHERE e.department_id=d.department_id 
AND d.department_name='Finance';


2. Writing DELETE in pre-23ai Oracle database using sub-query in the WHERE clause.

DELETE employees e
WHERE e.department_id in (
SELECT department_id
FROM departments
WHERE department_name='Finance');


3. Writing DELETE in Oracle 23ai database using direct join then query the tables.

When we run the SQL plan, we notice that the join is using the index EMP_DEPARTMENT_IX to access EMPLOYEES table. It is the same SQL plan and cost when using update with sub-query in the WHERE clause.

DELETE employees e
FROM departments d
WHERE e.department_id=d.department_id 
AND d.department_name='Finance';


Tuesday, January 2, 2024

Deploy Oracle Autonomous Database Free Container Image on Linux VM


- Overview:

  • Oracle announced the general availability of Autonomous Database free container image at Oracle 2023 Cloudworld.
  • The ADB free container image comes pre-built with the following components exactly like OCI ADB serverless public cloud service: 
    • Oracle Autonomous Databases (ADW or ATP).
    • Oracle Application Express (Apex).
    • Oracle Rest Data Service. (ORDS).
    • Database Actions including SQL Developer, Performance Hub.
    • MongoDB API.
  • You can use the free container image to perform a local development and the ability to merge your work later in an OCI ADB service.
  • Oracle Autonomous Database Free container minimum needs 4 CPUs and 8 GB memory.
  • The free container image is now available on Oracle Container Github Registry.  

In this blog, I'll demonstrate the steps to deploy the ADB free container image on an Oracle Linux VM running from Oracle VM VirtualBox on my laptop. 

 
Prerequisites:
  • Oracle VM VirtualBox installed.
  • Oracle Linux 8 VM with internet access running from Oracle VM VirtualBox.

Step #1: Install and Start Docker on Linux VM

As root user 

1. Install yum-utils package using command:
    dnf install -y dnf-utils zip unzip  

2. Enable all required repositories using command:
    dnf config-manager --add-repo=https://download.docker.com/linux/centos/docker-ce.repo

3. Install Docker using commands:
    dnf remove -y runc
    dnf install -y docker-ce --nobest

4. Enable and start Docker service using commands:
     systemctl start docker.service
     systemctl status docker.service


5. Confirm Docker version using command:
     docker version


Step #2: Download and Run ADB Free Container Image

As non root user with sudo privilege.

1. Pull the image from the repository and start a container to run ADB free container image using command:

sudo docker run -d \
-p 1521:1522 \
-p 1522:1522 \
-p 8443:8443 \
-p 27017:27017 \
--hostname <Your_Host_name Or IP Address> \
--cap-add SYS_ADMIN \ 
--device /dev/fuse \
--name <Your Docket container name> \
container-registry.oracle.com/database/adb-free:latest

Where:
- Ports:

Port

Description

1521

TLS

1522

mTLS

8443

HTTPS port for ORDS / APEX and Database Actions

27017

Mongo API ( MY_ATP )


- hostname: is the Fully Qualified Domain Name (FQDN) of your host.
For OFS mount, container should start with SYS_ADMIN capability. 
- Also, virtual device /dev/fuse should be accessible.


2. Check new Docker image using command:
     sudo docker image ls     


3. Check the status of the ADB container using command:
    sudo docker container ls


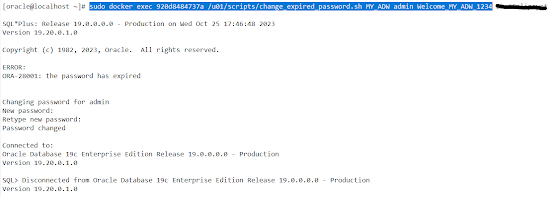
4. Change the preinstalled default expired password for the ADMIN user for MY_ADW and MY_ATP instances.
- For ATP instance
   sudo docker exec <Container_ID> /u01/scripts/change_expired_password.sh MY_ATP admin Welcome_MY_ATP_1234 <New Password>


- For ADW instance:
   sudo docker exec <Container_ID> /u01/scripts/change_expired_password.sh MY_ADW admin Welcome_MY_ADW_1234 <New Password>


Step #3: Sign-in to Web Database Actions

- APEX

https://<Host_Name>:8443/ords/my_atp/
https://<Host_Name>:8443/ords/my_adw/

- SQL Developer Web 
https://<Host_Name>:8443/ords/my_atp/sql-developer
https://<Host_Name>:8443/ords/my_adw/sql-developer

Sign-in with admin user and password previously reset in step #2.


Friday, December 29, 2023

Stop/Start Oracle Database Cloud Service using OCI CLI


- Overview:

  • Oracle Database Cloud Service (DBCS) supports stop billing for virtual machine databases. To take the advantage of this capability, you need to stop DB system's node (DB system virtual machine). 
  • Stopping a node stops billing for all OCPUs associated with that node. Billing resumes if you restart the node. However, the billing of other DBCS resources (like NVME disks) will continue.
  •  DB system nodes are stopped individually. For multi-node RAC DB systems, you may need to act on only one node.
  • You can stop/start DBCS node using
    • Oracle OCI console.
    • Oracle OCI CLI command line tool.
    • REST APIs.
In this blog, I'll demonstrate the commands to stop/start DBCS node using OCI CLI command line. 
If you have a requirement to run non-production DBCS on working hours only, then you can schedule stop/start commands (for example from CRONTAB).

Prerequisites:
  • An Oracle cloud fee trial or paid account.
  • Installed and configured OCI CLI client. I have OCI client installed and configured on Oracle OCI compute instance (a Linux virtual machine) under OPC account.

Stop DBCS Node

- OCI CLI command: oci db node stop --db-node-id <DBCS-Node-OCID>
- The JSON-formatted command's response will show "lifecycle-state": "STOPPING".
- You can get DBCS Node OCID from OCI console.
   1. Open the navigation menu. Select Oracle Database, then select Oracle Base Database.
   2. Select your Compartment. A list of DB systems is displayed.
   3. In the list of DB systems, find the DB system you want to stop, and then click its name to display  
       details about it.
   4. In the list of nodes, click the Actions menu for a node and click "copy OCID" action.    

- Example


Get the Status of DBCS Node

- OCI CLI command: oci db node get --db-node-id <DBCS-Node-OCID>
- The JSON-formatted command's response will show "lifecycle-state".
   - STOPPING: DB node is stopping.
   - STOPPED: DB node is stopped.
   - STARTING: DB node is starting.
   - AVAILABLE: DB node is running.

- Example


Start DBCS Node

- OCI CLI command: oci db node start --db-node-id <DBCS-Node-OCID>
- The JSON-formatted command's response will show "lifecycle-state": "STARTING".
- Example:


Oracle AI Database Private Agent Factory Overview

  From AI to Agentic AI To understand the Private Agent Factory, we must first look at the broader landscape of artificial intelligence.  Th...