Monday, July 15, 2024

Oracle 23ai: Enumeration domains - List of Values in the Database


- Overview:

  • Oracle Database 23ai introduces a new way to create lists of values: enumeration (enum) domains.
  • Benefits:
    • Create lists of name-value pairs in the database.
    • Query the enum as a list of values.
    • Limit column values to those in the enum list.
    • Use the enum names as constants in SQL statements.
    • Display the name of enum values.
  • To create an enumeration domain, use create domain as enum command and provide a list of names. This assigns the values to each name in the order listed, starting with one. Each name has a value one higher than the previous.
  • By default, they are case insensitive. If you want case sensitive names, as with table names place them in double quotes.
  • Enums have an implicit check constraint. The database applies this to the column when you associate the domain. This ensures you can only store the enum’s values in the column.
In this blog, I'll demonstrate the steps to create error message severity name-value pair lists of enums and associate enums with incidents table severity column.   

Prerequisites:
  • Oracle Database 23ai.

Demo 


1. Create an enumeration domain using below command.

     create domain <Domain Name> as enum (< comma separated list of values >);

    - In this demo, I'll create two an enumeration domains.
    - The first domain will provide a list of error messages severity. It starts with "Emergency" having the value of 1 to "Debug" which has the value of 8. Domain will provide a list of numbers values.

create domain err_msg_severity as enum (
Emergency, Alert, Critical, Error,
Warning, Notice, Informational, Debug);


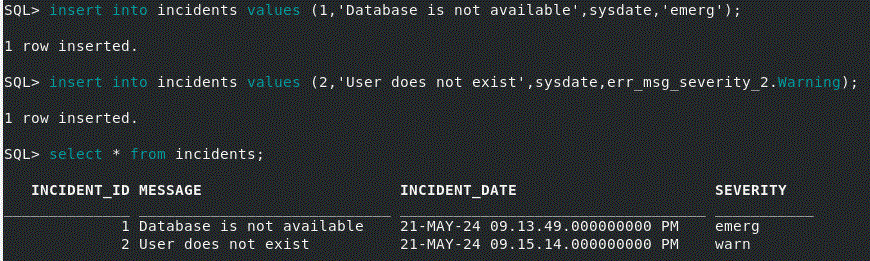
    - The second domain will provide the same list of error messages severity. It starts with "Emergency" having the value "emerg" to "Debug" which has the value of "debug". Domain will provide a list of characters values.

create domain err_msg_severity_2 as enum (
Emergency = 'emerg', 
Alert = 'alert', 
Critical = 'crit', 
Error = 'error',
Warning = 'warn', 
Notice = 'notice', 
Informational = 'info', 
Debug = 'debug'
);


2. Create incidents table where severity column uses the first domain (list of numbers values).
     Notice that severity column's data type is NUMBER.


3. Insert rows into incidents table. 
    - Remember that severity column value should be between 1 and 8. Assigning a value not between 1 and 8 will raise ORA-11534.

ORA-11534: check constraint (HR.SYS_C0013233) involving column SEVERITY due to domain constraint 


     - You can use <DOMAIN_NAME>.<ENUM_NAME> when providing a value to severity column.


4. Drop and recreate incidents table where severity column uses the second domain (list of characters values).
     Notice that severity column's data type is VARCHAR2.


5. Insert rows into incidents table. 
    - Remember you need to use <DOMAIN_NAME>.<ENUM_VALUE> when assigning a value to severity column or insert/update command will raise ORA-11534.


Thursday, June 20, 2024

Oracle 23ai: Fetch Top-N Rows Per Group Queries


Overview:

  • Oracle 23ai introduces the use of partition by clause in fetch first clause to get top-N rows per group.
  • A query's syntax
          SELECT ........
          FROM    ........
          ORDER BY <group>, <sort>
          FETCH FIRST <M> <group>, <N> ROWS ONLY

           Where:
           - group: a column or expression that will be used to group rows.
           - M: specifies how many different groups you want to return.
           - sort: a column or expression that will be used to sort rows ASC|DESC.
           - N: specifies the first rows for each group returned.

   In this blog, I'll show two demos demonstrating the use of partition by in fetch first clause to get top-N rows per group.


- Prerequisites:
  • Oracle Database 23ai.

Demo #1

- Fetch the two highest paid employees for the first three departments.

   Where:
    - group: column departments.department_id.
    - M: 3.
    - sort: column employees.salary DESC.
    - N: 2.

SELECT department_id,department_name, salary, first_name, last_name
FROM employees join DEPARTMENTS USING (DEPARTMENT_ID)
ORDER BY department_id, salary DESC
FETCH FIRST
      3 PARTITION by department_id,
      2 ROWS ONLY;


Demo #2

- Fetch the latest hired employee in each department. 

   Where:
    - group: column departments.department_id.
    - M: set to a large value. For example, 10000000.
    - sort: column employees.hire_date DESC.
    - N: 1.

SELECT DEPARTMENT_ID, HIRE_DATE, first_name, last_name
FROM employees 
ORDER BY DEPARTMENT_ID, HIRE_DATE DESC
FETCH FIRST
      999999999999 PARTITION by DEPARTMENT_ID,
      2 ROWS ONLY;


Wednesday, June 5, 2024

Oracle 23ai: Comparing and Sorting JSON Datatypes


- Overview:

  • Oracle first introduced the JSON datatype in Oracle database 21c.
  • Oracle Database 23ai introduces the option to compare and sort JSON datatypes.
    • It allows equality comparison and sorting of JSON values.
    • It is supported in WHERE, ORDER BY, and GROUP BY clauses.
    • It makes for more powerful SQL/JSON programs.
    • Avoids unexpected datatype conversion problems.
In this blog, I'll show different demos demonstrating JSON datatype comparing and sorting.

- Prerequisites:
  • Oracle Database 23ai.
  • SQL Developer.

Demo #1: Compare JSON Documents in Two Tables


1. Create two tables with a column, which has a JSON datatype. 

create table json_data1 (col1 json);
create table json_data2 (col2 json);

2. Insert JSON documents into both tables with a name object has name and address fields, and address field has street and city individual fields.
  
INSERT into json_data1 
values (' {"name":"Scott", "address": {"street":"123 Bay St", "City":"Toronto"} }');
INSERT into json_data2 
values (' {"name":"Adam", "address": {"City":"Toronto", "street":"123 Bay St"} }');

    - You notice that the city and street in above JSON documents are in a different order across the two different tables.

3. Join the two tables on address field.
    - Prior to 23ai, we would need to know the fields within the address to compare individual fields.
    - However in 23ai, this becomes much more easier, where we join two tables with address fields without pointing to the individual fields within the field address as shown below.

select * from json_data1 t1, json_data2 t2 where t1.col1.address = t2.col2.address;

Demo #2: JSON Type Comparison


1. Create a table with a column, which has a JSON datatype.

create table json_tab (col1 json);

2. Insert JSON documents with a name object has fname and lname fields.

insert into json_tab values ('{"name": {"fname":"Scott", "lname":"Tiger"} }');
insert into json_tab values ('{"name": {"fname":"Adam", "lname":"Smith"} }');
insert into json_tab values ('{"name": {"lname":"Tiger", "fname":"Scott"} }');


3. Query the table by trying to match name object where fname/lname fields are in a different order. 
    - Notice that, the query will return the first 2 documents where fname/lname fields are in a different order and fname/lname fields are in the same order.

select * from json_tab t
where t.col1.name = json('{"lname":"Tiger", "fname":"Scott"}');


Demo #3: Sorting Mixed JSON Type Values


1. Create a table with a column, which has a JSON datatype.

create table json_sort (col1 json);

2. Insert different documents with a variety of  array, numeric, and string values.

insert into json_sort values ('{"jdoc": {"a":"b", "c": 1} }'); --- object 
insert into json_sort values ('{"jdoc": {"a":"z", "c": 10} }'); --- object
insert into json_sort values ('{"jdoc": [100, 500, 1000] }'); --- Array
insert into json_sort values ('{"jdoc": 20 }'); --- numeric  
insert into json_sort values ('{"jdoc": 60 }'); --- numeric 
insert into json_sort values ('{"jdoc": "10" }'); --- string


3. Query the rows using string ordering (using JSON_SERIALIZE function).

select t.col1.jdoc from json_sort t order by JSON_SERIALIZE(t.col1.jdoc);


4. Query the rows in JSON type default order, which is number, string, object, array.

select t.col1.jdoc from json_sort t order by t.col1.jdoc;


Tuesday, June 4, 2024

Oracle 23ai: JSON Schema Support


- Overview:

  • Oracle first introduced the ability to display a JSON schema when they introduced the JSON Data in Oracle 12.2, but without the option to validate the structure of JSON document.
  • Oracle Database 23ai introduces a new feature called JSON Schema
  • A JSON Schema can validate the structure and contents of JSON documents in your database when defining a JSON column in our table.
  • A JSON Schema is a declarative language that allows us to annotate and validate JSON documents, which helps avoid errors in production that were missed in development.
  • A JSON schema specifies the allowed properties for JSON documents.
  • A JSON Schema validation is available also as a PL/SQL utility function.
In this blog, I'll demonstrate the use of the VALIDATE clause along with the JSON schema when defining a JSON column in our table.

- Prerequisites:
  • Oracle Database 23ai.

Demo #1: A simple validation using the IS JSON keywords


1. Create a table with a column, which has a JSON datatype with a check constraint. 
     A "IS JSON VALIDATE USING" clause will be used for check constraint validation. 
     
    create table json_tab (
    col1 json constraint json_tab_col1_isjson check (col1 is json validate using
     '{
       "type":"object",
       "minProperties":2
      }')
     );   


2. Insert JSON data into the table.
    - Insert invalid JSON data by inserting an array. This will raise ORA-40875 error.

       insert into json_tab values ('["a","b"]');


    - Insert valid JSON data.

       insert into json_tab values ('{"a":1,"b":2}');


Demo #2: A simple validation using the shorthand syntax without the constraint keyword


1. Create a table with a column, which has a JSON datatype without a check constraint.
    A "VALIDATE USING" clause will be used for JSON document validation. 
    The JSON document has two properties price (number) and name (string).

    create table json_tab2 (
    col1 json validate using
      '{
        "type":"object",
        "properties": {"price":{"type":"number"},
                               "name": {"type":"string"}
                              }
       }'
    );


2. Insert JSON data into the table.
    - Insert invalid JSON data by inserting a JSON document with invalid price property value datatype. This will raise ORA-40875 error.

insert into json_tab2 values ('{"price":"ten", "name":"widget"}');   --- price property value is string


- Insert valid JSON data.

   insert into json_tab2 values ('{"price":10, "name":"widget"}');


Demo #3: A simple validation using SQL-Domain based JSON Validation Rules


1. Create SQL-Domain with a column, which has a JSON datatype without a check constraint.
    A "VALIDATE USING" clause will be used for JSON document validation. 
    The JSON document has two required properties width and height where both properties have a number datatype and minimum and maximum values. 

create domain json_size_domain as json validate using
 ' { "type": "object",
     "required": [ "width", "height" ],
     "properties": {
                    "width": { "type": "number", "minimum":20, "maximum": 62 },
                    "height": { "type": "number", "minimum":25, "maximum": 50 }
                    }
    } ';

2. Create a table with a column, which has a JSON datatype and uses the created domain.

create table json_tab3 (col1 json domain json_size_domain);


3. Insert JSON data into the table.
    - Insert invalid JSON data by inserting a JSON document where width property has invalid value (< minimum value). This will raise ORA-40875 error.

insert into json_tab3 values ('{"width":0, "height":49}'); --- width value < 20 (minimum value) 


- Insert valid JSON data.

insert into json_tab3 values ('{"width":30, "height":49}');


Demo #4: Validate using the VALIDATE_REPORT utility Function


1. Call VALIDATE_REPORT utility function on an invalid JSON document. The function will report back "valid":"false" with the error message.


2. Call VALIDATE_REPORT utility function on a valid JSON document. The function will report back "valid":"true" 


Wednesday, May 15, 2024

Oracle 23ai: Quick Overview


Oracle Database 23ai

  • Oracle database 23ai is the next long-term support release of Oracle database.
  • It brings AI to your data with the addition of AI Vector search to Oracle's relational database. 

The difference between Oracle database 23c and Oracle database 23ai

  • Oracle database 23c is renamed as database 23ai following the importance of AI technology in this release. 
  • Oracle database 23ai is the version 23.4.0.0.0 and will be referred to as moving forward.

Why should you upgrade to Oracle database 23ai?

  • Oracle database 23ai offers five years of premium support and three years of extended support.
  • Oracle database 19c premier support ends on April 30, 2026and Extended Support (ES) will be May 01, 2026 through April 30, 2027, giving you a longer support overlap with Oracle Database 23ai. (Oracle Database Release MOS Doc ID 742060.1).


  • Oracle database 23ai unifies the relational and document data models to provide the best of both data models worlds in one database with the addition of JSON Relational Duality Views. So instead of using two separated databases (relational and non-relational databases), developers can operate on the same underlying data as either JSON documents, using standard document APIs, or as relational, using standard SQL. To learn more.
  • Oracle database 23ai introduces AI Vector Search feature. It is the capability, that stores and searches the semantic content of documents, images, and other unstructured data as vectors and use these to run fast similarity queries. A vector is a popular data structure used in AI applications. Oracle AI Vector Search allows you to generate, store, index, and query vector embeddings along with other business data, using the full power of SQL. To lean more.
  • Oracle database 23ai offers a faster database processing comparing with previous database releases.  
  • In addition to more than 300 new features compared to previous databases releases such as SQL Firewall and True Cache

Upgrade from a previous version to Oracle database 23ai

  • Oracle provides a direct database upgrade path from Oracle database 19c and 21c to Oracle database 23ai.
  • All other versions of the database need to upgrade to 19c or 21c versions, and then to 23ai.
  • The specific upgrade process may vary depending on the current version and configuration of your particular Oracle Database deployment.

Oracle database 23ai free trial

  • Oracle offers free trials for Oracle Database 23ai through:
    • Oracle Cloud Infrastructure (OCI) with Autonomous Database Free Tier.
    • Oracle Database 23ai Free is available for download as a Linux RPM file, an Oracle Linux-based Docker image, or Oracle Virtual Box VM. To get free Oracle 23ai.
    • Starting the end of June 2024, Oracle Database 23ai free is available for Oracle Linux 8 and Windows. The resource limits for Oracle Database Free are up to 2 CPUs for foreground processes, 2 GB of RAM and 12 GB of user data on disk. It is packaged for ease of use and simple download. To get free downloads


Thursday, March 14, 2024

ExaCC: Disable Oracle Archivelog Automatic Deletion Job


- Problem:

  • Some of my (ExaCC) customers reported that Oracle archive logs are automatically deleted for some databases running on ExaCC cluster, even they haven't deleted or not configured a job to backup and delete archive logs.  

- Overview:

  • Whenever we create a database on ExaCC cluster from OCI console, Oracle will add a crontab job  in VM cluster nodes to auto delete archive logs every 30 minutes.
  • Oracle uses "bkup_api" tool to auto delete archive logs.

- Checking:

   - As root user run below command to get the contents of "bkup_api" config file for your database.
     /var/opt/oracle/bkup_api/bkup_api get config --file=/<output_file> --dbname=<DB_NAME>


   - Search output config file for parameter "bkup_archlog_cron_entry". If the value is "yes", then this confirms that there is a scheduled job to automatic cleanup of archive logs.

  $ cat /tmp/exadb_bkp.conf | grep bkup_archlog_cron_entry
bkup_archlog_cron_entry=yes

    - As root user search "/etc/crontab" file for a cleanup entry specific to your database.

$ cat /etc/crontab_dba_bkp | grep exadb
19,49 * * * * oracle /var/opt/oracle/bkup_api/bkup_api bkup_archlogs --cron --dbname=exadb

     As you can see above, there is a crontab job that cleanup archive logs for database exadb every 30 minutes. 

- Solution:

- The recommended solution is configuring archive log deletion policy in RMAN repository.
For example,
CONFIGURE ARCHIVELOG DELETION POLICY TO BACKED UP 1 TIMES TO DEVICE TYPE DISK;
CONFIGURE ARCHIVELOG DELETION POLICY TO BACKED UP 1 TIMES TO DEVICE TYPE 'SBT_TAPE';

- A workaround solution, which is not recommended:
 
1. As a root user, take a backup of "/etc/crontab" file on ExaCC VM 1st node.
2. As a root user, edit file "/etc/crontab" and remove entry related to archive maintenance for each database.

In our example, remove below line.
19,49 * * * * oracle /var/opt/oracle/bkup_api/bkup_api bkup_archlogs --cron --dbname=exadb

NOTE:  You need to remove line completely from crontab, commenting out may not work in ExaCC.

3. Check "/etc/crontab" file on other DB nodes also and make sure there are no entries for archive maintenance.


MySQL: Move MySQL OCI DB System to Different Compartment


- Overview:

  • There is no option on OCI console to move MySQL DB system to different compartment.
  • The only option, which is available at the time of writing this blog, is to create a new DB system in different compartment by restoring the backup of the original MySQL DB system. 
  • There are three types of MySQL DB system backups to restore from.
    •  Automatic Backup.
    • Manual Backup.
    • Operator Backup.
  • When you create a new DB system from a backup, it retains the administrator credentials of the original DB system.
  • When you restore an automatic, manual, or operator backup, you restore the complete data of the original DB system in the same tenancy.
  • You cannot create a DB system that has the same IP address as a running DB system. If you want to use the same IP address, delete the original running DB system. 

In this blog, I'll demonstrate the steps to create new MySQL DB system by restoring from the backup of another running DB system using OCI console. 

 - Prerequisites:

  • An Oracle cloud fee trial or paid account.
  • An existing MySQL DB system.  
  • An existing manual or Automatic backup for the MySQL DB system.

Steps Restoring From a Backup

1. Sign in to the OCI console.
2. Open the navigation menu and navigate to "Databases -> DB Systems".


3. Choose your compartment. The list of MySQL DB system is displayed. Click your DB system name.


4. Choose the "Restore to new DB system" from the Actions menu.


5. On the "Restore to a new DB System" panel, there are two options to restore from: 
- Restore from DB system at a point-in-time


- Restore from a backup
 In our example, select "Restore from a backup" and click "Select backup".


6. On the "Browse all Backups" panel, select the backup from the list of available backups, and click "Select backup". I'll use the manual backup, which was taken previously.


7. On "Provide DB system information" panel, provide the information of new DB system.
- Compartment: make sure to select the right target compartment.
- DB system name.


- DB system type: Select Standalone for a single-instance DB system, and select High availability for a three-instance DB system.
- Configure networking: select VCN and private subnet.


- Select a shape: you can select a different shape other than the shape of the original running DB system.
- Define Data storage size: should be equal or greater than the storage size of the original running DB system.


- Configure backup plan.


8. Finally, click "Restore".

9. On DB system details home page and under General information section, it will show in the description "Restored from backup".


Now, you have a new standalone DB system, which has the complete data of the original DB system in different compartment.


Oracle AI Database Private Agent Factory Overview

  From AI to Agentic AI To understand the Private Agent Factory, we must first look at the broader landscape of artificial intelligence.  Th...