Wednesday, July 31, 2024

Oracle 23ai: Unrestricted Parallel DMLs


- Overview:

  • Oracle database allows DML statements to be executed in parallel mode by breaking the DML statements into exclusive smaller tasks.
  • However in releases prior Oracle database 23ai, parallel DML operations had a limitation. Once an object is modified by a parallel DML statement, that object cannot be read or modified by later statements of the same transaction before ending the transaction by executing commit or rollback.
  • Oracle Database 23ai removes that restriction and by introducing "Unrestricted Parallel DMLs or Unrestricted Direct Loads" feature.

- Benefits: 

  • In the same transaction session and before ending the transaction, you can:
    • Query the same table multiple times
    • Perform serial or parallel DML on the same table
    • Perform multiple direct loads 
  • Overhead Reduced
    • Enable parallel DML in a session
    • Separate commits are not required after each parallel DML statement 
    • Take the full advantage of using parallel DMLs in the same transaction 

- Restrictions: 
  • Heap organized table only.
  • No ASSM tablespaces

- How to Enable Parallel DML Mode: 

  • The parallel DML mode is required because parallel DML and serial DML have different locking, transaction, and disk space requirements and parallel DML is disabled for a session by default.
  • When parallel DML is disabled, no DML is executed in parallel even if the PARALLEL hint is used.
  • When parallel DML is enabled in a session, all DML statements in this session are considered for parallel execution.
  • Run below SQL statement to enable parallel DML mode in a session:

ALTER SESSION ENABLE PARALLEL DML;

  • Enable unrestricted parallel DML mode in a specific SQL statement, include the ENABLE_PARALLEL_DML hint.

INSERT /*+ ENABLE_PARALLEL_DML */ …

  • However, even if parallel DML is enabled, the DML operation may still execute serially if there are no parallel hints or no tables with a parallel attribute or if restrictions on parallel operations are violated.

- Practice:
  • In this practice, I'll enable parallel DML and perform a parallel insert (non-unrestricted) without commit or rollback. After the insert, I'll run a select from the same table and it will cause an error.
  • Then I'll perform the parallel insert using unrestricted parallel hint without commit or rollback, After I'll run select and additional insert without errors.
1. Create a new table.

SQL> create table test_dmls as select * from objects_objects;


Table TEST_DMLS created.


2. Alter the session and enable parallel DML.

SQL> alter session enable parallel dml;


Session altered.


3. Insert into the table with PARALLEL hint.

SQL> insert /*+ parallel(test_dmls 4) */ into test_dmls

            select /*+ parallel(test_dmls 4) */ * from test_dmls;


 76,237 rows inserted.


4. Select from the table without performing a commit or rollback. You will get and error.

SQL> select count(*) from test_dmls;


Error starting at line : 1 in command -

select count(*) from test_dmls

SQL ORA-12838: cannot read/modify an object after modifying it in parallel


More Details :

https://docs.oracle.com/error-help/db/ora-12838/


SQL> !oerr ora 12838

12838, 00000, "cannot read/modify an object after modifying it in parallel"

// *Cause: Within the same transaction, an attempt was made to add read or 

// modification statements on a table after it had been modified in parallel

// or with direct load. This is not permitted.

// *Action: Rewrite the transaction, or break it up into two transactions:

// one containing the initial modification and the second containing the

// parallel modification operation.


5.  Perform a commit.

SQL> commit;


Commit complete.


6. After the commit is done, now you can select again from the table.

SQL> select count(*) from test_dmls;


   COUNT(*)

___________

     152474


7. Perform a parallel insert using ENABLE_PARALLEL_DML hint.

SQL> insert /*+ enable_parallel_dml(test_dmls 4) */ into test_dmls

            select /*+ enable_parallel_dml(test_dmls 4) */ * from test_dmls;


152,474 rows inserted.


8. Select from the table without performing a commit or rollback. Now you will NOT get an error.

SQL> select count(*) from test_dmls;


   COUNT(*)

___________

     304948


9. Perform another parallel insert without a commit or rollback. No error.

SQL> insert /*+ enable_parallel_dml(test_dmls 4) */ into test_dmls

  2* select /*+ enable_parallel_dml(test_dmls 4) */ * from test_dmls;


304,948 rows inserted.


SQL> /


609,896 rows inserted.


SQL> /


1,219,792 rows inserted.


SQL> select count(*) from test_dmls;


   COUNT(*) 

___________ 

    2439584 


Tuesday, July 30, 2024

Oracle 23ai: Lock Free Reservations Capability


- Overview:

  • In previous database releases when a column value of a row is updated by adding or subtracting from it, all other updates to that row are blocked until the transaction is committed or rolled back.
  • Oracle Database 23ai introduces a new feature called "Lock Free Reservationsthat allows multiple concurrent updates on a numeric column value to proceed without being blocked by uncommitted updates when adding or subtracting from the column value.
  • Used with applications operate on numeric aggregate data. Such as data involve subtraction or addition of the values rather than assigning a value.
  • The Lock Free Reservation feature is enabled by default. A Lock Free Reservation parameter, named "lockfree_reservation", is provided at the PDB level.
  • To use Lock Free Reservation, use the RESERVABLE keyword to declare a RESERVABLE numeric column when you CREATE or ALTER a table.

- Benefits: 

  • Reserve values without locking.
  • Value locked on commit.
  • Short held locks.
  • Improved concurrency.
  • Reduced bottlenecks. 

- Use Cases:
  • Bank account balance (debt and credit transactions).
  • Inventory and supply chain control.
  • Ticketing 


- Restrictions:
  • Only numeric data type.
  •  Table must have a primary key.
  • A Reservable column cannot be part of foreign key constraint. 
  • A Reservable column cannot be a primary key, virtual column, or identity column.
  • Indexes are not supported on a Reservable column.
  • No updates on multiple Reservable columns in a table. 
  • No mixing non-Reservable and Reservable columns updates.

- Demo:

In this demo I'll create a table "ACCOUNTS". The table will have a Reservable numeric column "Balance". I'll reduce the balance in one session without committing the transaction, then I'll try to reduce the balance of the same account from another session where I'll get an error notifying there is not enough value to reduce the balance.

1. Create a table (HR.ACCOUNTS) with a Reservable numeric column (BALANCE). The column will have a CHECK constraint to enforce a minimum balance value.
Note: a CHECK constraint is NOT a mandatory with a Reservable column.

create table accounts (

acc_id number primary key,

acc_name varchar2(10),

balance number reservable constraint accounts_bal_ck check (balance >= 50)

);


2. Select from USER_TAB_COLUMNS and USER_TABLES views to see information about the lock free table and reservable column.

select table_name,column_name,reservable_column 

from user_tab_columns where table_name='ACCOUNTS';


select table_name,has_reservable_column

from user_tables where table_name='ACCOUNTS';


3. Find the name of the journal table created when the accounts tables was created with a reservable column.

select table_name,tablespace_name

from user_tables where table_name like 'SYS_RESER%';


4.  Perform a describe and select from the journal table.

desc SYS_RESERVJRNL_77307

select * from SYS_RESERVJRNL_77307;


5. Insert and commit a row into ACCOUNTS table and run select.

insert into accounts values (100,'SCOTT',89);

commit;

select * from accounts;


6. Update the row without a commit and select from the journal table. The journal table will have a record for the uncommitted updated row executed in that session.

Note: A select from accounts table will show balance value unchanged, because the update has not committed. We are just reserving the balance.


7. Open a new database session and run the same update statement. 
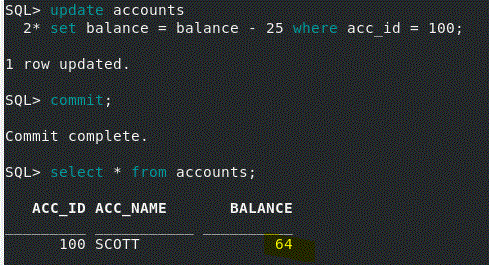
Even we see the balance is 89, the update will get an error because of CHECK constraint violation. The first transaction in the first session reserved 25 making only 64 available until the transaction commit or rollbacks, the transaction in session 2 would violate the check constraint.


8. Go back to the first first session and perform a rollback.

9. Go back to the second session and run the update again and commit.


10. Go back to the first session and select the row from the table. With the update and commit in session 2 the balance is now updated. 

11. Query the journal table contents. With no pending truncations there are no rows in the table.


    Monday, July 15, 2024

    Oracle 23ai: Enumeration domains - List of Values in the Database


    - Overview:

    • Oracle Database 23ai introduces a new way to create lists of values: enumeration (enum) domains.
    • Benefits:
      • Create lists of name-value pairs in the database.
      • Query the enum as a list of values.
      • Limit column values to those in the enum list.
      • Use the enum names as constants in SQL statements.
      • Display the name of enum values.
    • To create an enumeration domain, use create domain as enum command and provide a list of names. This assigns the values to each name in the order listed, starting with one. Each name has a value one higher than the previous.
    • By default, they are case insensitive. If you want case sensitive names, as with table names place them in double quotes.
    • Enums have an implicit check constraint. The database applies this to the column when you associate the domain. This ensures you can only store the enum’s values in the column.
    In this blog, I'll demonstrate the steps to create error message severity name-value pair lists of enums and associate enums with incidents table severity column.   

    Prerequisites:
    • Oracle Database 23ai.

    Demo 


    1. Create an enumeration domain using below command.

         create domain <Domain Name> as enum (< comma separated list of values >);

        - In this demo, I'll create two an enumeration domains.
        - The first domain will provide a list of error messages severity. It starts with "Emergency" having the value of 1 to "Debug" which has the value of 8. Domain will provide a list of numbers values.

    create domain err_msg_severity as enum (
    Emergency, Alert, Critical, Error,
    Warning, Notice, Informational, Debug);


        - The second domain will provide the same list of error messages severity. It starts with "Emergency" having the value "emerg" to "Debug" which has the value of "debug". Domain will provide a list of characters values.

    create domain err_msg_severity_2 as enum (
    Emergency = 'emerg', 
    Alert = 'alert', 
    Critical = 'crit', 
    Error = 'error',
    Warning = 'warn', 
    Notice = 'notice', 
    Informational = 'info', 
    Debug = 'debug'
    );


    2. Create incidents table where severity column uses the first domain (list of numbers values).
         Notice that severity column's data type is NUMBER.


    3. Insert rows into incidents table. 
        - Remember that severity column value should be between 1 and 8. Assigning a value not between 1 and 8 will raise ORA-11534.

    ORA-11534: check constraint (HR.SYS_C0013233) involving column SEVERITY due to domain constraint 


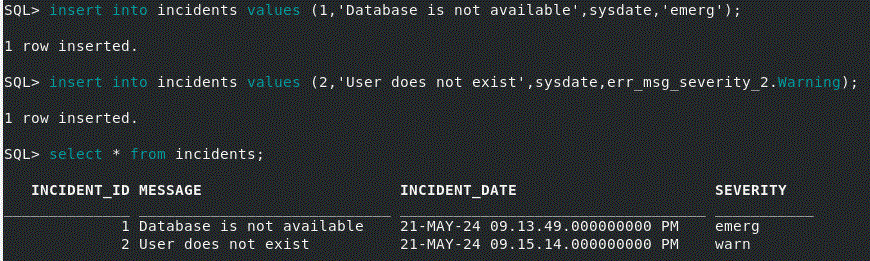
         - You can use <DOMAIN_NAME>.<ENUM_NAME> when providing a value to severity column.


    4. Drop and recreate incidents table where severity column uses the second domain (list of characters values).
         Notice that severity column's data type is VARCHAR2.


    5. Insert rows into incidents table. 
        - Remember you need to use <DOMAIN_NAME>.<ENUM_VALUE> when assigning a value to severity column or insert/update command will raise ORA-11534.


    Thursday, June 20, 2024

    Oracle 23ai: Fetch Top-N Rows Per Group Queries


    Overview:

    • Oracle 23ai introduces the use of partition by clause in fetch first clause to get top-N rows per group.
    • A query's syntax
              SELECT ........
              FROM    ........
              ORDER BY <group>, <sort>
              FETCH FIRST <M> <group>, <N> ROWS ONLY

               Where:
               - group: a column or expression that will be used to group rows.
               - M: specifies how many different groups you want to return.
               - sort: a column or expression that will be used to sort rows ASC|DESC.
               - N: specifies the first rows for each group returned.

       In this blog, I'll show two demos demonstrating the use of partition by in fetch first clause to get top-N rows per group.


    - Prerequisites:
    • Oracle Database 23ai.

    Demo #1

    - Fetch the two highest paid employees for the first three departments.

       Where:
        - group: column departments.department_id.
        - M: 3.
        - sort: column employees.salary DESC.
        - N: 2.

    SELECT department_id,department_name, salary, first_name, last_name
    FROM employees join DEPARTMENTS USING (DEPARTMENT_ID)
    ORDER BY department_id, salary DESC
    FETCH FIRST
          3 PARTITION by department_id,
          2 ROWS ONLY;


    Demo #2

    - Fetch the latest hired employee in each department. 

       Where:
        - group: column departments.department_id.
        - M: set to a large value. For example, 10000000.
        - sort: column employees.hire_date DESC.
        - N: 1.

    SELECT DEPARTMENT_ID, HIRE_DATE, first_name, last_name
    FROM employees 
    ORDER BY DEPARTMENT_ID, HIRE_DATE DESC
    FETCH FIRST
          999999999999 PARTITION by DEPARTMENT_ID,
          2 ROWS ONLY;


    Wednesday, June 5, 2024

    Oracle 23ai: Comparing and Sorting JSON Datatypes


    - Overview:

    • Oracle first introduced the JSON datatype in Oracle database 21c.
    • Oracle Database 23ai introduces the option to compare and sort JSON datatypes.
      • It allows equality comparison and sorting of JSON values.
      • It is supported in WHERE, ORDER BY, and GROUP BY clauses.
      • It makes for more powerful SQL/JSON programs.
      • Avoids unexpected datatype conversion problems.
    In this blog, I'll show different demos demonstrating JSON datatype comparing and sorting.

    - Prerequisites:
    • Oracle Database 23ai.
    • SQL Developer.

    Demo #1: Compare JSON Documents in Two Tables


    1. Create two tables with a column, which has a JSON datatype. 

    create table json_data1 (col1 json);
    create table json_data2 (col2 json);

    2. Insert JSON documents into both tables with a name object has name and address fields, and address field has street and city individual fields.
      
    INSERT into json_data1 
    values (' {"name":"Scott", "address": {"street":"123 Bay St", "City":"Toronto"} }');
    INSERT into json_data2 
    values (' {"name":"Adam", "address": {"City":"Toronto", "street":"123 Bay St"} }');

        - You notice that the city and street in above JSON documents are in a different order across the two different tables.

    3. Join the two tables on address field.
        - Prior to 23ai, we would need to know the fields within the address to compare individual fields.
        - However in 23ai, this becomes much more easier, where we join two tables with address fields without pointing to the individual fields within the field address as shown below.

    select * from json_data1 t1, json_data2 t2 where t1.col1.address = t2.col2.address;

    Demo #2: JSON Type Comparison


    1. Create a table with a column, which has a JSON datatype.

    create table json_tab (col1 json);

    2. Insert JSON documents with a name object has fname and lname fields.

    insert into json_tab values ('{"name": {"fname":"Scott", "lname":"Tiger"} }');
    insert into json_tab values ('{"name": {"fname":"Adam", "lname":"Smith"} }');
    insert into json_tab values ('{"name": {"lname":"Tiger", "fname":"Scott"} }');


    3. Query the table by trying to match name object where fname/lname fields are in a different order. 
        - Notice that, the query will return the first 2 documents where fname/lname fields are in a different order and fname/lname fields are in the same order.

    select * from json_tab t
    where t.col1.name = json('{"lname":"Tiger", "fname":"Scott"}');


    Demo #3: Sorting Mixed JSON Type Values


    1. Create a table with a column, which has a JSON datatype.

    create table json_sort (col1 json);

    2. Insert different documents with a variety of  array, numeric, and string values.

    insert into json_sort values ('{"jdoc": {"a":"b", "c": 1} }'); --- object 
    insert into json_sort values ('{"jdoc": {"a":"z", "c": 10} }'); --- object
    insert into json_sort values ('{"jdoc": [100, 500, 1000] }'); --- Array
    insert into json_sort values ('{"jdoc": 20 }'); --- numeric  
    insert into json_sort values ('{"jdoc": 60 }'); --- numeric 
    insert into json_sort values ('{"jdoc": "10" }'); --- string


    3. Query the rows using string ordering (using JSON_SERIALIZE function).

    select t.col1.jdoc from json_sort t order by JSON_SERIALIZE(t.col1.jdoc);


    4. Query the rows in JSON type default order, which is number, string, object, array.

    select t.col1.jdoc from json_sort t order by t.col1.jdoc;


    Tuesday, June 4, 2024

    Oracle 23ai: JSON Schema Support


    - Overview:

    • Oracle first introduced the ability to display a JSON schema when they introduced the JSON Data in Oracle 12.2, but without the option to validate the structure of JSON document.
    • Oracle Database 23ai introduces a new feature called JSON Schema
    • A JSON Schema can validate the structure and contents of JSON documents in your database when defining a JSON column in our table.
    • A JSON Schema is a declarative language that allows us to annotate and validate JSON documents, which helps avoid errors in production that were missed in development.
    • A JSON schema specifies the allowed properties for JSON documents.
    • A JSON Schema validation is available also as a PL/SQL utility function.
    In this blog, I'll demonstrate the use of the VALIDATE clause along with the JSON schema when defining a JSON column in our table.

    - Prerequisites:
    • Oracle Database 23ai.

    Demo #1: A simple validation using the IS JSON keywords


    1. Create a table with a column, which has a JSON datatype with a check constraint. 
         A "IS JSON VALIDATE USING" clause will be used for check constraint validation. 
         
        create table json_tab (
        col1 json constraint json_tab_col1_isjson check (col1 is json validate using
         '{
           "type":"object",
           "minProperties":2
          }')
         );   


    2. Insert JSON data into the table.
        - Insert invalid JSON data by inserting an array. This will raise ORA-40875 error.

           insert into json_tab values ('["a","b"]');


        - Insert valid JSON data.

           insert into json_tab values ('{"a":1,"b":2}');


    Demo #2: A simple validation using the shorthand syntax without the constraint keyword


    1. Create a table with a column, which has a JSON datatype without a check constraint.
        A "VALIDATE USING" clause will be used for JSON document validation. 
        The JSON document has two properties price (number) and name (string).

        create table json_tab2 (
        col1 json validate using
          '{
            "type":"object",
            "properties": {"price":{"type":"number"},
                                   "name": {"type":"string"}
                                  }
           }'
        );


    2. Insert JSON data into the table.
        - Insert invalid JSON data by inserting a JSON document with invalid price property value datatype. This will raise ORA-40875 error.

    insert into json_tab2 values ('{"price":"ten", "name":"widget"}');   --- price property value is string


    - Insert valid JSON data.

       insert into json_tab2 values ('{"price":10, "name":"widget"}');


    Demo #3: A simple validation using SQL-Domain based JSON Validation Rules


    1. Create SQL-Domain with a column, which has a JSON datatype without a check constraint.
        A "VALIDATE USING" clause will be used for JSON document validation. 
        The JSON document has two required properties width and height where both properties have a number datatype and minimum and maximum values. 

    create domain json_size_domain as json validate using
     ' { "type": "object",
         "required": [ "width", "height" ],
         "properties": {
                        "width": { "type": "number", "minimum":20, "maximum": 62 },
                        "height": { "type": "number", "minimum":25, "maximum": 50 }
                        }
        } ';

    2. Create a table with a column, which has a JSON datatype and uses the created domain.

    create table json_tab3 (col1 json domain json_size_domain);


    3. Insert JSON data into the table.
        - Insert invalid JSON data by inserting a JSON document where width property has invalid value (< minimum value). This will raise ORA-40875 error.

    insert into json_tab3 values ('{"width":0, "height":49}'); --- width value < 20 (minimum value) 


    - Insert valid JSON data.

    insert into json_tab3 values ('{"width":30, "height":49}');


    Demo #4: Validate using the VALIDATE_REPORT utility Function


    1. Call VALIDATE_REPORT utility function on an invalid JSON document. The function will report back "valid":"false" with the error message.


    2. Call VALIDATE_REPORT utility function on a valid JSON document. The function will report back "valid":"true" 


    Oracle AI Database Private Agent Factory Overview

      From AI to Agentic AI To understand the Private Agent Factory, we must first look at the broader landscape of artificial intelligence.  Th...