Thursday, March 14, 2024

ExaCC: Disable Oracle Archivelog Automatic Deletion Job


- Problem:

  • Some of my (ExaCC) customers reported that Oracle archive logs are automatically deleted for some databases running on ExaCC cluster, even they haven't deleted or not configured a job to backup and delete archive logs.  

- Overview:

  • Whenever we create a database on ExaCC cluster from OCI console, Oracle will add a crontab job  in VM cluster nodes to auto delete archive logs every 30 minutes.
  • Oracle uses "bkup_api" tool to auto delete archive logs.

- Checking:

   - As root user run below command to get the contents of "bkup_api" config file for your database.
     /var/opt/oracle/bkup_api/bkup_api get config --file=/<output_file> --dbname=<DB_NAME>


   - Search output config file for parameter "bkup_archlog_cron_entry". If the value is "yes", then this confirms that there is a scheduled job to automatic cleanup of archive logs.

  $ cat /tmp/exadb_bkp.conf | grep bkup_archlog_cron_entry
bkup_archlog_cron_entry=yes

    - As root user search "/etc/crontab" file for a cleanup entry specific to your database.

$ cat /etc/crontab_dba_bkp | grep exadb
19,49 * * * * oracle /var/opt/oracle/bkup_api/bkup_api bkup_archlogs --cron --dbname=exadb

     As you can see above, there is a crontab job that cleanup archive logs for database exadb every 30 minutes. 

- Solution:

- The recommended solution is configuring archive log deletion policy in RMAN repository.
For example,
CONFIGURE ARCHIVELOG DELETION POLICY TO BACKED UP 1 TIMES TO DEVICE TYPE DISK;
CONFIGURE ARCHIVELOG DELETION POLICY TO BACKED UP 1 TIMES TO DEVICE TYPE 'SBT_TAPE';

- A workaround solution, which is not recommended:
 
1. As a root user, take a backup of "/etc/crontab" file on ExaCC VM 1st node.
2. As a root user, edit file "/etc/crontab" and remove entry related to archive maintenance for each database.

In our example, remove below line.
19,49 * * * * oracle /var/opt/oracle/bkup_api/bkup_api bkup_archlogs --cron --dbname=exadb

NOTE:  You need to remove line completely from crontab, commenting out may not work in ExaCC.

3. Check "/etc/crontab" file on other DB nodes also and make sure there are no entries for archive maintenance.


MySQL: Move MySQL OCI DB System to Different Compartment


- Overview:

  • There is no option on OCI console to move MySQL DB system to different compartment.
  • The only option, which is available at the time of writing this blog, is to create a new DB system in different compartment by restoring the backup of the original MySQL DB system. 
  • There are three types of MySQL DB system backups to restore from.
    •  Automatic Backup.
    • Manual Backup.
    • Operator Backup.
  • When you create a new DB system from a backup, it retains the administrator credentials of the original DB system.
  • When you restore an automatic, manual, or operator backup, you restore the complete data of the original DB system in the same tenancy.
  • You cannot create a DB system that has the same IP address as a running DB system. If you want to use the same IP address, delete the original running DB system. 

In this blog, I'll demonstrate the steps to create new MySQL DB system by restoring from the backup of another running DB system using OCI console. 

 - Prerequisites:

  • An Oracle cloud fee trial or paid account.
  • An existing MySQL DB system.  
  • An existing manual or Automatic backup for the MySQL DB system.

Steps Restoring From a Backup

1. Sign in to the OCI console.
2. Open the navigation menu and navigate to "Databases -> DB Systems".


3. Choose your compartment. The list of MySQL DB system is displayed. Click your DB system name.


4. Choose the "Restore to new DB system" from the Actions menu.


5. On the "Restore to a new DB System" panel, there are two options to restore from: 
- Restore from DB system at a point-in-time


- Restore from a backup
 In our example, select "Restore from a backup" and click "Select backup".


6. On the "Browse all Backups" panel, select the backup from the list of available backups, and click "Select backup". I'll use the manual backup, which was taken previously.


7. On "Provide DB system information" panel, provide the information of new DB system.
- Compartment: make sure to select the right target compartment.
- DB system name.


- DB system type: Select Standalone for a single-instance DB system, and select High availability for a three-instance DB system.
- Configure networking: select VCN and private subnet.


- Select a shape: you can select a different shape other than the shape of the original running DB system.
- Define Data storage size: should be equal or greater than the storage size of the original running DB system.


- Configure backup plan.


8. Finally, click "Restore".

9. On DB system details home page and under General information section, it will show in the description "Restored from backup".


Now, you have a new standalone DB system, which has the complete data of the original DB system in different compartment.


Monday, February 5, 2024

MySQL: Updating the Configuration of a MySQL DB System on OCI


- Overview:

  • A MySQL configuration is a collection of variables that define the operation of a MySQL DB system. It is analogous to the my.ini or my.cnf files that you use in on-premises MySQL server installation.
  • Each configuration is linked to a shape of the MySQL DB system.
  • There are two types of configuration:
    • Default Configuration are defined in MySQL Database service and designed for a specific shape and contains a default set of configuration variables.
    • Custom Configuration are user defined.
  • Types of Configuration Variables:
    • System variables are not user configurable. For the same shape, there are different configurations for standalone and HA.
    • User variables are those variables that you can edit when create or copy a configuration.
    • Initialization variables apply for the life span of the MySQL instance and, once you apply it, you cannot change it later. There is currently only one initialization variable lower_case_table_name 
    • Service-specific variables are those variables that are specific only to MySQL database OCI service. Currently there are two variables:
      • thread_pool_dedicated_listeners
      • thread_pool_max_transactions_limit
  • Updating DB system configuration to a new config that contains only dynamic user variables does not require DB system restart. 

In this blog, I'll demonstrate the steps to update the configuration of an existing MySQL DB system to use another MySQL configuration (MyConfig3) from the OCI console. 

 - Prerequisites:


 - Limitations:
  • You cannot update/select a configuration that change initialization variables of a DB system.

Steps to Update a MySQL DB System Configuration

1. Sign in to the OCI console.
2. Open the navigation menu and navigate to "Databases -> DB Systems".


3. Choose your compartment. The list of MySQL DB system is displayed. Click your DB system name.


4. In DB system details page and under DB system configuration section, click Edit next to Configuration option.


5. In "Edit DB system" window and under Configuration section, click "change configuration" button.


6. In the Browse configurations window, select MyConfig3 from the list.


Note: in my example selecting MyConfig2 is not an option because it attempts to change the initialization variables of the DB system.


7. Once you select the new config, Edit DB system window will show the name of new config and a compare configurations table that shows variables compares. Click "save changes" buttons. 


8. DB system status will be UPDATING, but the database will NOT restart because all changed variables are dynamic.


9. Once update finishes, the configuration name will be changed to new config.


MySQL: Creating a MySQL Configuration on OCI


- Overview:

  • A MySQL configuration is a collection of variables that define the operation of a MySQL DB system. It is analogous to the my.ini or my.cnf files that you use in on-premises MySQL server installation.
  • Each configuration is linked to a shape of the MySQL DB system.
  • There are two types of configuration:
    • Default Configuration are defined in MySQL Database service and designed for a specific shape and contains a default set of configuration variables.
    • Custom Configuration are user defined.
  • Types of Configuration Variables:
    • System variables are not user configurable. For the same shape, there are different configurations for standalone and HA.
    • User variables are those variables that you can edit when create or copy a configuration.
    • Initialization variables apply for the life span of the MySQL instance and, once you apply it, you cannot change it later. There is currently only one initialization variable lower_case_table_name 
    • Service-specific variables are those variables that are specific only to MySQL database OCI service. Currently there are two variables:
      • thread_pool_dedicated_listeners
      • thread_pool_max_transactions_limit

In this blog, I'll demonstrate the steps to create MySQL configuration using OCI console for MySQL.VM.Standard.E3.1.8GB shape, then create new MySQL standalone DB system using the new configuration.

- Prerequisites:

  • An Oracle cloud fee trial or paid account.
  • OCI compartment.


Steps to Create a MySQL Configuration


1. Sign in to the OCI console.
2. Open the navigation menu and navigate to "Databases -> Configurations".


3. The list of configurations is displayed. Choose your compartment.
4. Click "Create Configuration" button.


5. In "Create Configuration" window, enter and select below options, then click "Create" button.
    - Enter  name and description.
    - Select compartment.
    - Click "Change shape" button and select MySQL.VM.Standard.E3.1.8GB shape from the list.
    - Under the "User variables" section, add below variables:
       - max_connections = 200
       - sort_buffer_size = 500000
       - time_zone = -5:00


6. Once create configuration finishes, the configuration details page is displayed.


7. We can now use the new configuration when creating MySQL DB system. In "Create DB system" wizard: 
    - Under "Configure hardware" section, make sure to select "MySQL.VM.Standard.E3.1.8GB" shape. 


    - Click "Show advanced options", select "Configuration" tab and click "Select configuration" button, then select "MyConfig" configuration from the available list.


Friday, February 2, 2024

Oracle 23ai: Configuring SQL Firewall Using the DBMS_SQL_FIREWALL Package


- Overview:

  • Oracle 23ai has SQL Firewall built into the database to effectively address both SQL injection attacks and compromised account issues. 
  • By building Oracle SQL Firewall inside the database and streamlining its implementation, the performance overhead of Oracle SQL Firewall is negligible, making it suitable for all production workloads. Because Oracle SQL Firewall is inside the database, you don’t need to deploy or manage any external components.
  • There are two methods of configuring SQL Firewall, either with Oracle Data Safe or with the DBMS_SQL_FIREWALL package. Both methods have their advantages, depending on how you want to use SQL Firewall. 


In this blog, I'll demonstrate the SQL Firewall functionality using the DBMS_SQL_FIREWALL Package.

Prerequisites:
  • Oracle Database 23ai Free Developer Release.
  • HR database schema.

SQL Firewall Process Flow:


SQL Firewall Configuration Steps

 
1. Connect to pluggable database as a user who has been granted the SQL_FIREWALL_ADMIN role. SYS user will be used for this example.

2. Enable SQL Firewall.

EXEC DBMS_SQL_FIREWALL.ENABLE;


3. Create and enable the SQL firewall capture for HR database user.

 BEGIN
          DBMS_SQL_FIREWALL.CREATE_CAPTURE (
               username         => 'HR',
               top_level_only   => TRUE,
               start_capture    => TRUE
          );
       END;
        /


top_level_only controls the level of SQL statements that are required. The default is FALSE. 
- TRUE generates capture logs only for top-level SQL statements that the user directly runs.
- FALSE generates capture logs for both top-level SQL statements and commands issued from PL/SQL units. 
start_capture controls whethe capture will be effective. The default is TRUE.
- TRUE enables SQL Firewall to start capturing the target user's activities right away.
- FALSE creates a capture for the user, but does not start the capture right away. You can start the capture later on by running DBMS_SQL_FIREWALL.START_CAPTURE('<USERNAME>') 

4. At this stage, assuming that you have set  START_CAPTURE to TRUE. Connect to the database as a user HR to run the SQL statements that are expected to be executed directly later.

For example,
select FIRST_NAME,LAST_NAME,JOB_ID from employees where DEPARTMENT_ID=110;
select FIRST_NAME,LAST_NAME,MANAGER_ID from employees where JOB_ID='AD_VP';
select * from departments where DEPARTMENT_NAME='Payroll';

5. As s SYS user, review the capture logs and sessions logs to determine the adequacy of the capture.

SELECT SQL_TEXT FROM DBA_SQL_FIREWALL_CAPTURE_LOGS WHERE USERNAME = 'HR';


6. As a SYS user, stop the capture. 

EXEC DBMS_SQL_FIREWALL.STOP_CAPTURE ('HR')


7. As a SYS user, generate the allow-list for the user. The allow-list defines the SQL statements that the user will be allowed to perform. SQL Firewall creates the allow-list based on data collected from existing capture logs for the user.

EXEC DBMS_SQL_FIREWALL.GENERATE_ALLOW_LIST ('HR')


8. As a SYS user, query DBA_SQL_FIREWALL_ALLOWED_SQL to find information about activities that the HR user is allowed to perform.

SELECT SQL_TEXT FROM DBA_SQL_FIREWALL_ALLOWED_SQL WHERE USERNAME = 'HR';


9. As SYS user, enable SQL Firewall protection by enabling the allow-list that was generated for the user. This enablement becomes effective immediately, even in the existing sessions of HR user.

BEGIN
  DBMS_SQL_FIREWALL.ENABLE_ALLOW_LIST (
    username       => 'HR',
    enforce        => DBMS_SQL_FIREWALL.ENFORCE_SQL,
    block          => TRUE
   );
END;
/


enforce specifies one of the following enforcement types:
-  DBMS_SQL_FIREWALL.ENFORCE_CONTEXT enforces the allowed contexts that have been configured.
DBMS_SQL_FIREWALL.ENFORCE_SQL enforces the allowed SQL that has been configured.
DBMS_SQL_FIREWALL.ENFORCE_ALL enforces both allowed contexts and allowed SQL. This setting is the default.
 
block 
- TRUE blocks the user's database connection or the user's SQL execution whenever the user violates the allow-list definition.
- FALSE allows unmatched user database connections or SQL commands to proceed. This setting is the default.

10. At this stage, if HR user attempts to perform a SQL query that violates the allow-list and you have specified SQL Firewall to block this SQL, then an ORA-47605 error appears. 
Connect as HR user and run SQL statements that are different than queries which have been captured.

select * from employees;
select FIRST_NAME,LAST_NAME,JOB_ID,salary from employees where DEPARTMENT_ID=110;
SELECT * FROM EMPLOYEES WHERE SALARY > 2000;
select * from departments where DEPARTMENT_NAME='Payroll';


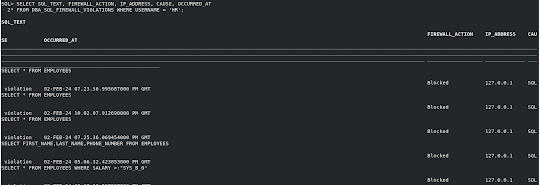
11. As as SYS user, Monitor the violation log for abnormal SQL connection attempts or SQL queries that are reported if they are not in allow-list.

SELECT SQL_TEXT, FIREWALL_ACTION, IP_ADDRESS, CAUSE, OCCURRED_AT FROM DBA_SQL_FIREWALL_VIOLATIONS WHERE USERNAME = 'HR';


- Reference


Oracle AI Database Private Agent Factory Overview

  From AI to Agentic AI To understand the Private Agent Factory, we must first look at the broader landscape of artificial intelligence.  Th...